If you’ve been searching for the perfect dessert to brighten up a children’s birthday party, look no further than this Hello Kitty cake. Inspired by the iconic Japanese cartoon character that has charmed generations worldwide, this whimsical confection will bring a smile to everyone’s face. With its fluffy vanilla interior, creamy buttercream frosting, and fondant decorations arranged in a kawaii Hello Kitty motif, this cake is as delightful to look at as it is to eat.
This recipe will guide you through every step, from mixing the cake batter and crafting the character’s signature bow to shaping the fondant ears and assembling a neat kitty face. Don’t worry if you’re not a seasoned pastry chef—our instructions are detailed, approachable, and designed to ensure you achieve a show-stopping result, even if you’re new to cake decorating. Whether you’re hosting a Hello Kitty-themed birthday party or simply want to surprise a fan of the beloved Sanrio character, this cake will elevate your dessert table with a burst of cuteness and flavor.
Why You’ll Love This Recipe
1. Adorable Presentation: The Hello Kitty cake isn’t just another dessert; it’s a centerpiece. The sweet kitty face, pink bow, and carefully placed fondant details transform an ordinary cake into a celebratory masterpiece. Your friends and family will be amazed by the adorable design, making this cake perfect for Instagram-worthy birthday celebrations, baby showers, and kids’ parties.
2. Easy-To-Follow Instructions: Even if you’re a baking novice, you’ll find this recipe straightforward and manageable. We’ve broken down every step to ensure you can confidently tackle each phase, from mixing the batter to applying the frosting and fondant details. It’s a character-themed birthday cake you can truly create at home.
3. Classic, Crowd-Pleasing Flavor: Beneath the charming decorations lies a moist, fluffy vanilla cake—an all-time favorite flavor that appeals to both kids and adults. Topped with a smooth buttercream frosting, this dessert delivers classic sweetness that pairs perfectly with a cup of tea or a glass of cold milk.
4. Customizable Decoration Options: While we’ll show you how to create the signature Hello Kitty details, you can easily adapt the colors, add extra fondant flowers, or incorporate sprinkles for a personalized twist. This freedom lets you tailor the design to match party themes or personal preferences.
Ingredients
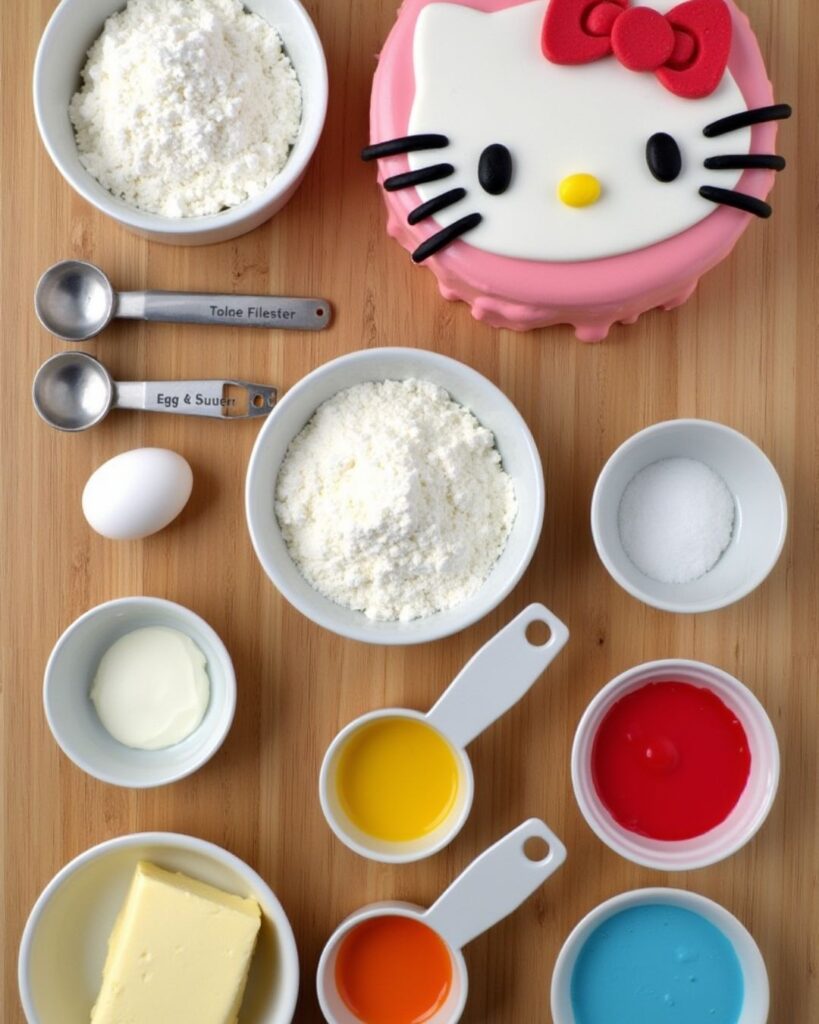
Before you begin, gather all your ingredients and ensure they’re at room temperature for optimal results. Using high-quality ingredients will elevate both the taste and texture of your cake.
For the Cake:
- 3 cups (360 g) all-purpose flour
- 2 ½ teaspoons baking powder
- ½ teaspoon baking soda
- ½ teaspoon salt
- 1 cup (225 g) unsalted butter, softened
- 2 cups (400 g) granulated sugar
- 4 large eggs, room temperature
- 1 tablespoon pure vanilla extract
- 1 ¼ cups (300 ml) whole milk, room temperature
For the Buttercream Frosting:
- 1 ½ cups (340 g) unsalted butter, softened
- 5 cups (600 g) powdered sugar, sifted
- 3-4 tablespoons whole milk (adjust as needed)
- 2 teaspoons pure vanilla extract
- A pinch of salt
For the Fondant Decorations:
- 1 pound (450 g) white fondant
- 2-3 drops black gel food coloring (for the whiskers and eyes)
- 2-3 drops yellow gel food coloring (for the nose)
- Pink fondant or pink gel food coloring for the bow and details
- Cornstarch for dusting work surface
- Edible glue or a small amount of water for attaching fondant pieces
Tools and Equipment:
- Two 9-inch (23 cm) round cake pans
- Parchment paper
- Stand mixer or handheld mixer
- Large mixing bowls
- Rubber spatula
- Offset spatula
- Rolling pin (for fondant)
- Sharp knife or fondant cutter
- Piping bags (optional)
- Cake board or serving plate
- Cake leveler or a long serrated knife
How to Make Hello Kitty Cake
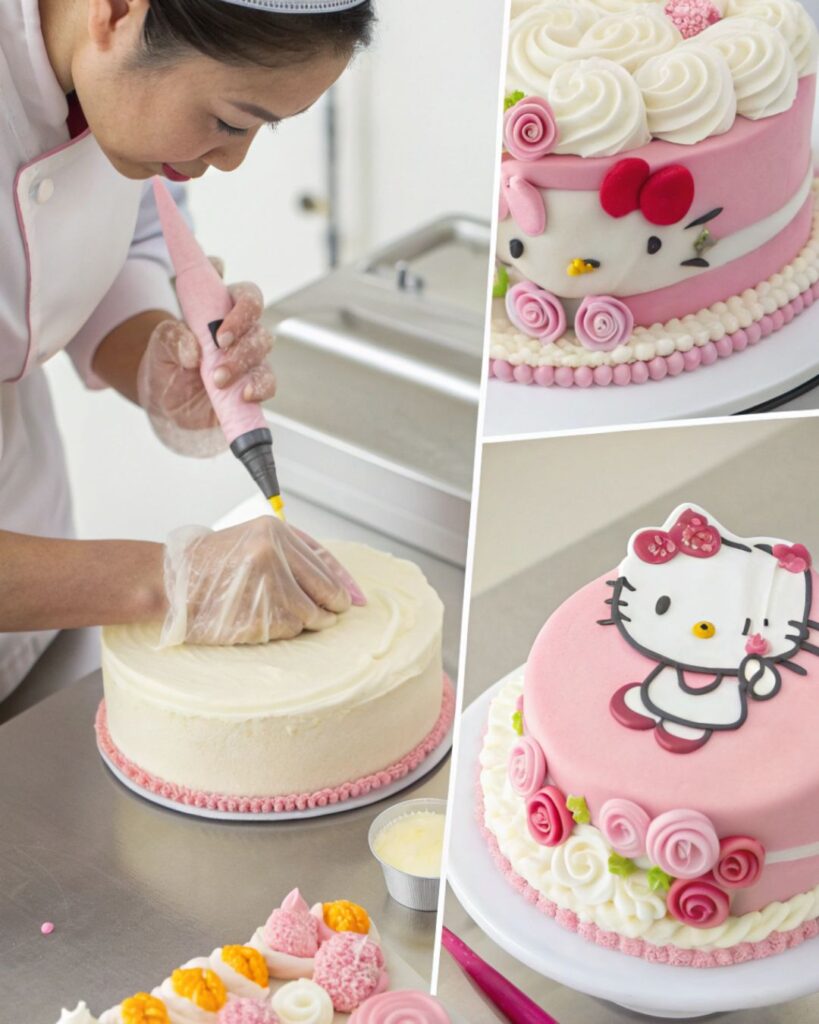
Step 1: Prepare Your Cake Pans and Preheat the Oven
Preheat your oven to 350°F (175°C). Grease the two 9-inch round cake pans and line the bottoms with parchment paper. Greasing the pans and adding parchment ensures the cakes will release easily.
Step 2: Mix the Dry Ingredients
In a medium bowl, whisk together the all-purpose flour, baking powder, baking soda, and salt. This step aerates the mixture and helps achieve a light, fluffy cake texture.
Step 3: Cream the Butter and Sugar
In a large mixing bowl or the bowl of a stand mixer, cream together the softened butter and granulated sugar on medium speed until light and fluffy, about 3-4 minutes. Creaming properly incorporates air, setting the foundation for a tender cake crumb.
Step 4: Add the Eggs and Vanilla
Add the eggs one at a time, beating well after each addition. Then, mix in the vanilla extract. Scrape down the sides of the bowl with a spatula to ensure everything is well incorporated.
Step 5: Alternate the Dry Ingredients and Milk
With the mixer on low speed, add one-third of the flour mixture, followed by half of the milk. Repeat, ending with the last third of the flour. Mix just until the batter is smooth—avoid overmixing, as it can lead to a denser cake.
Step 6: Divide and Bake
Divide the cake batter evenly between the prepared pans. Smooth the tops with a spatula and give the pans a gentle tap on the counter to release any air bubbles. Bake for 25-30 minutes or until a toothpick inserted into the center comes out clean. Rotate the pans halfway through to ensure even baking.
Step 7: Cool the Cakes
Once done, let the cakes cool in their pans for about 10 minutes. Then, run a knife around the edges to loosen and carefully invert them onto wire racks. Peel off the parchment paper and allow the cakes to cool completely before frosting—this can take about an hour or more.
Step 8: Prepare the Buttercream Frosting
Beat the softened butter in a large bowl until creamy. Gradually add the sifted powdered sugar, one cup at a time, mixing on low speed to avoid a sugar cloud. Add 2 teaspoons vanilla extract and a pinch of salt. Pour in the milk, one tablespoon at a time, until you reach a smooth, spreadable consistency. Increase the speed to medium-high and beat for an additional 2 minutes to achieve a fluffy texture.
Step 9: Level and Fill the Cakes
If necessary, level the tops of your cakes using a cake leveler or long serrated knife. Place one cake layer on a cake board or serving plate. Spread a generous layer of buttercream over the surface. Top with the second cake layer, pressing gently to secure.
Step 10: Crumb Coat and Chill
Apply a thin layer of buttercream over the entire cake—this is the crumb coat, which helps seal in any loose cake crumbs and creates a smooth surface for your final coat of frosting. Refrigerate the cake for about 30 minutes until the crumb coat is firm to the touch.
Step 11: Final Coat of Buttercream
Once chilled, apply a thicker layer of buttercream frosting all over the cake. Use an offset spatula to achieve a smooth, even finish. This layer should serve as the backdrop for the Hello Kitty decorations.
Step 12: Shaping the Hello Kitty Face
Hello Kitty’s face is essentially an oval shape with simple details, so you can leave the cake round and focus on fondant accents. Alternatively, for a more authentic look, you can trim the cake slightly at the sides to create a more oval shape. If you choose to carve it, do so carefully and apply a thin layer of frosting to smooth out any rough edges.
Step 13: Fondant Decorations
- Eyes and Whiskers:
Tint a small portion of white fondant with black gel food coloring. Knead until the color is fully incorporated. Roll it out and cut out two small oval shapes for the eyes. Roll thin strips for the whiskers. Set aside. - Nose:
Tint another small piece of fondant with yellow gel food coloring. Shape it into a tiny oval for the nose. - Bow:
For the iconic pink bow, either use pre-colored pink fondant or tint some white fondant pink. Roll it out to about 1/8-inch thickness. Cut two loops for the bow and a small rectangle for the center. Pinch the loops to create the bow shape and secure with a small dab of water or edible glue. Press the center piece on top. Let it set for a few minutes to firm up.
Step 14: Assemble the Face
Carefully position the fondant eyes on the cake, evenly spaced. Place the nose between and slightly below the eyes. Add the whiskers (three on each side) gently pressing them into the buttercream. Finally, place the pink bow on the upper left side of the cake’s “head.” Gently press all pieces into the buttercream so they stay in place.
Step 15: Finishing Touches
Use a small, clean brush to remove any excess cornstarch from the fondant pieces. Ensure the face looks balanced and symmetrical. Adjust as needed until you’re satisfied with the final appearance.
Serving and Storage Tips
Serving Suggestions:
- Slice and serve at room temperature for the best flavor and texture.
- Pair with a cup of hot tea, coffee, or cold milk for a delightful dessert experience.
- Consider serving your Hello Kitty cake with a side of fresh berries, a dollop of whipped cream, or a strawberry coulis for a fruity accent.
Storage Guidelines:
- If you’re not serving the cake immediately, keep it covered in a cake dome or airtight container at room temperature for up to 2-3 days.
- For longer storage, place the cake in the refrigerator. The fondant details and frosting may firm up slightly, but letting the cake come to room temperature before serving restores its best texture.
- Fondant decorations tend to absorb moisture from the frosting, so if you plan to store the cake for more than a day, consider applying decorations closer to the serving time.
Helpful Notes
- Working with Fondant: If you’re new to fondant, don’t be intimidated. Dust your work surface with a little cornstarch to prevent sticking and roll fondant slowly. If it becomes too sticky, pause, add a bit more cornstarch, and continue rolling.
- Coloring Fondant and Frosting: Gel food coloring is more concentrated than liquid coloring and won’t thin out your fondant or frosting. Add color a drop at a time until you reach the desired shade.
- Using a Template: If you’re worried about getting Hello Kitty’s facial features just right, print out a picture of her face and use it as a reference. You can gently trace shapes onto fondant with a toothpick before cutting.
- Make Ahead Options:
- Cake Layers: You can bake the cake layers 1-2 days in advance. Wrap them tightly in plastic wrap and store at room temperature.
- Frosting: The buttercream can be prepared a day ahead and stored in the refrigerator. Let it come to room temperature and re-whip before use.
- Fondant Decor: Fondant pieces can be shaped a day in advance and stored in an airtight container to maintain their shape.
- Scaling the Recipe: If you need a larger cake for a big gathering, double the recipe and use larger pans or create a two-tiered version. Just be prepared with extra fondant and frosting.
Conclusion
Creating a Hello Kitty cake at home is not only possible, it’s a joyful and gratifying process. This adorable dessert will capture the hearts of your guests with its iconic look and familiar sweet flavors. By following these easy steps, you’ll produce a moist vanilla cake layered with velvety buttercream frosting, crowned by charming fondant decorations that pay homage to a timeless character loved by children and adults alike.
Take your time, enjoy the creative process, and personalize it to make this cake uniquely yours. Whether it’s a birthday surprise, a special party treat, or a dessert to brighten someone’s day, this Hello Kitty cake will leave a lasting impression, sweetening not just your taste buds but also your cherished celebrations.
_____________________________
Hello Kitty Cake Recipe
Ingredients
For the Cake:
- 3 cups 360 g all-purpose flour
- 2 ½ teaspoons baking powder
- ½ teaspoon baking soda
- ½ teaspoon salt
- 1 cup 225 g unsalted butter, softened
- 2 cups 400 g granulated sugar
- 4 large eggs room temperature
- 1 tablespoon pure vanilla extract
- 1 ¼ cups 300 ml whole milk, room temperature
For the Buttercream Frosting:
- 1 ½ cups 340 g unsalted butter, softened
- 5 cups 600 g powdered sugar, sifted
- 3-4 tablespoons whole milk adjust as needed
- 2 teaspoons pure vanilla extract
- A pinch of salt
For the Fondant Decorations:
- 1 pound 450 g white fondant
- 2-3 drops black gel food coloring for the whiskers and eyes
- 2-3 drops yellow gel food coloring for the nose
- Pink fondant or pink gel food coloring for the bow and details
- Cornstarch for dusting work surface
- Edible glue or a small amount of water for attaching fondant pieces
Instructions
Step 1: Prepare Your Cake Pans and Preheat the Oven
- Preheat your oven to 350°F (175°C). Grease the two 9-inch round cake pans and line the bottoms with parchment paper. Greasing the pans and adding parchment ensures the cakes will release easily.
Step 2: Mix the Dry Ingredients
- In a medium bowl, whisk together the all-purpose flour, baking powder, baking soda, and salt. This step aerates the mixture and helps achieve a light, fluffy cake texture.
Step 3: Cream the Butter and Sugar
- In a large mixing bowl or the bowl of a stand mixer, cream together the softened butter and granulated sugar on medium speed until light and fluffy, about 3-4 minutes. Creaming properly incorporates air, setting the foundation for a tender cake crumb.
Step 4: Add the Eggs and Vanilla
- Add the eggs one at a time, beating well after each addition. Then, mix in the vanilla extract. Scrape down the sides of the bowl with a spatula to ensure everything is well incorporated.
Step 5: Alternate the Dry Ingredients and Milk
- With the mixer on low speed, add one-third of the flour mixture, followed by half of the milk. Repeat, ending with the last third of the flour. Mix just until the batter is smooth—avoid overmixing, as it can lead to a denser cake.
Step 6: Divide and Bake
- Divide the cake batter evenly between the prepared pans. Smooth the tops with a spatula and give the pans a gentle tap on the counter to release any air bubbles. Bake for 25-30 minutes or until a toothpick inserted into the center comes out clean. Rotate the pans halfway through to ensure even baking.
Step 7: Cool the Cakes
- Once done, let the cakes cool in their pans for about 10 minutes. Then, run a knife around the edges to loosen and carefully invert them onto wire racks. Peel off the parchment paper and allow the cakes to cool completely before frosting—this can take about an hour or more.
Step 8: Prepare the Buttercream Frosting
- Beat the softened butter in a large bowl until creamy. Gradually add the sifted powdered sugar, one cup at a time, mixing on low speed to avoid a sugar cloud. Add 2 teaspoons vanilla extract and a pinch of salt. Pour in the milk, one tablespoon at a time, until you reach a smooth, spreadable consistency. Increase the speed to medium-high and beat for an additional 2 minutes to achieve a fluffy texture.
Step 9: Level and Fill the Cakes
- If necessary, level the tops of your cakes using a cake leveler or long serrated knife. Place one cake layer on a cake board or serving plate. Spread a generous layer of buttercream over the surface. Top with the second cake layer, pressing gently to secure.
Step 10: Crumb Coat and Chill
- Apply a thin layer of buttercream over the entire cake—this is the crumb coat, which helps seal in any loose cake crumbs and creates a smooth surface for your final coat of frosting. Refrigerate the cake for about 30 minutes until the crumb coat is firm to the touch.
Step 11: Final Coat of Buttercream
- Once chilled, apply a thicker layer of buttercream frosting all over the cake. Use an offset spatula to achieve a smooth, even finish. This layer should serve as the backdrop for the Hello Kitty decorations.
Step 12: Shaping the Hello Kitty Face
- Hello Kitty’s face is essentially an oval shape with simple details, so you can leave the cake round and focus on fondant accents. Alternatively, for a more authentic look, you can trim the cake slightly at the sides to create a more oval shape. If you choose to carve it, do so carefully and apply a thin layer of frosting to smooth out any rough edges.
Step 13: Fondant Decorations
- Eyes and Whiskers: Tint a small portion of white fondant with black gel food coloring. Knead until the color is fully incorporated. Roll it out and cut out two small oval shapes for the eyes. Roll thin strips for the whiskers. Set aside.
- Nose: Tint another small piece of fondant with yellow gel food coloring. Shape it into a tiny oval for the nose.
- Bow: For the iconic pink bow, either use pre-colored pink fondant or tint some white fondant pink. Roll it out to about 1/8-inch thickness. Cut two loops for the bow and a small rectangle for the center. Pinch the loops to create the bow shape and secure with a small dab of water or edible glue. Press the center piece on top. Let it set for a few minutes to firm up.
Step 14: Assemble the Face
- Carefully position the fondant eyes on the cake, evenly spaced. Place the nose between and slightly below the eyes. Add the whiskers (three on each side) gently pressing them into the buttercream. Finally, place the pink bow on the upper left side of the cake’s “head.” Gently press all pieces into the buttercream so they stay in place.
Step 15: Finishing Touches
- Use a small, clean brush to remove any excess cornstarch from the fondant pieces. Ensure the face looks balanced and symmetrical. Adjust as needed until you’re satisfied with the final appearance.
Notes
Nutrition Information (per serving)
- Calories: ~950 kcal
- Total Fat: ~46 g
- Saturated Fat: ~29 g
- Cholesterol: ~135 mg
- Sodium: ~280 mg
- Carbohydrates: ~140 g
- Sugars: ~100 g
- Protein: ~6 g
- Fiber: ~1 g
FAQs
1. Can I Use a Different Cake Flavor Instead of Vanilla?
Absolutely. While the classic vanilla flavor pairs beautifully with the Hello Kitty theme, you can opt for chocolate, strawberry, or even a funfetti cake base. Just ensure the cake you choose is sturdy enough to hold up under the buttercream and fondant decorations.
2. Do I Need Special Tools for the Fondant Decorations?
You don’t need fancy tools. A rolling pin, a sharp knife, and maybe a small fondant cutter for precise shapes are enough. If you have cookie cutters, they can come in handy. A small paintbrush and edible glue (or water) will help attach the fondant pieces neatly.
3. How Far in Advance Can I Make the Cake?
You can bake the cake layers 1-2 days ahead. Store them properly and frost them the day of the event for the freshest taste and texture. Fondant decorations can be made a day in advance. For best results, assemble and decorate the cake closer to the serving time.
4. Can I Replace the Buttercream Frosting with Whipped Cream or Cream Cheese Frosting?
Yes, but keep in mind that buttercream provides a stable base for fondant decorations. Whipped cream frosting is lighter and may cause fondant to soften. Cream cheese frosting, while delicious, may not hold its shape as well. Adjust the design and decorations accordingly if you choose these alternatives.
5. How Do I Prevent My Fondant from Cracking?
If your fondant is cracking, it may be too dry. Knead in a little vegetable shortening or glycerin to restore pliability. Also, keep it covered when not in use to prevent it from drying out.
6. Is It Possible to Make a Vegan or Gluten-Free Version of This Cake?
Yes. For a vegan version, use a plant-based butter substitute, non-dairy milk, and egg replacements. For a gluten-free version, choose a reputable gluten-free flour blend. Adjust the frosting and fondant accordingly—many vegan buttercream recipes and gluten-free fondants are available. Just follow instructions for your chosen substitutes to ensure the best outcome.
7. Where Can I Find Edible Gel Food Coloring and Fondant?
You can find these at most baking supply stores, craft stores, or online. Brands like Wilton and AmeriColor offer gel food coloring, and several brands produce quality fondant. Choose brands known for consistent results.
8. Can I Freeze Leftover Cake Slices?
Yes. Wrap slices in plastic wrap and place them in an airtight container. Freeze for up to 2 months. Thaw at room temperature before serving, and enjoy the nostalgic taste of your Hello Kitty cake even after the celebration ends.




Wow! Thank you