When it comes to baking homemade cookies, most people imagine a long list of dry ingredients, creaming butter and sugar, carefully measuring flour, and balancing baking soda with baking powder. While it’s true that traditional cookie recipes can be a bit time-consuming, there’s a delicious shortcut that can take you straight to soft, fluffy cookie heaven with minimal effort—Cake Mix and Cool Whip Cookies!
This wonderful dessert hack uses just a handful of pantry-friendly items, including boxed cake mix and a dollop of whipped topping, to create sweet treats that taste like they’ve been lovingly prepared from scratch. The result? Perfectly tender cookies with a light, pillowy texture that almost melts in your mouth. Even better, you can whip up a batch in about 20 minutes, making these cookies a lifesaver when you need a last-minute dessert or have a sudden sweet tooth.
Whether you’re new to baking or a seasoned pro, this recipe will become one of your go-to solutions for a quick and delightful treat. In this comprehensive guide, you’ll learn everything from why you’ll love these cookies to detailed baking instructions, helpful notes, and serving tips. Let’s dive in and discover just how simple and delicious these Cake Mix and Cool Whip Cookies can be.
Why You’ll Love This Recipe
1. Quick and Easy: For those of us who crave homemade cookies but find ourselves short on time, this recipe is a dream come true. By starting with a box of cake mix and a tub of Cool Whip, you cut down on measuring multiple ingredients, ensuring your cookies come together in a flash—no complicated steps required.
2. Only a Handful of Ingredients: Most traditional cookie recipes require butter, flour, sugar, and a variety of other elements. Here, you’re looking at only three main ingredients: cake mix, Cool Whip, and eggs. You can jazz them up with your favorite mix-ins, but the base remains incredibly simple.
3. Fluffy, Chewy Texture: A standout feature of these cookies is their texture. They’re soft, airy, and slightly chewy, thanks to the whipped topping. The cake mix provides both flavor and structure, resulting in a cookie that tastes like a cross between a classic sugar cookie and a light, tender cupcake top.
4. Endless Flavor Variations: Feel free to experiment with different cake mix flavors—chocolate, strawberry, lemon, red velvet, or even funfetti. Add in chocolate chips, candy pieces, sprinkles, or chopped nuts to personalize each batch. The possibilities are nearly limitless.
5. Perfect for Last-Minute Guests or Bake Sales: Whether you have unexpected company at the door or need a quick dessert for a bake sale or potluck, these cookies have you covered. Their ease and speed of preparation ensure you always have a fresh, homemade sweet treat on hand.
6. Kid-Friendly and Fun: This recipe is easy enough for novice bakers, including children. It’s a great way to introduce kids to the joy of baking without overwhelming them with complicated steps or long ingredient lists.
Ingredients
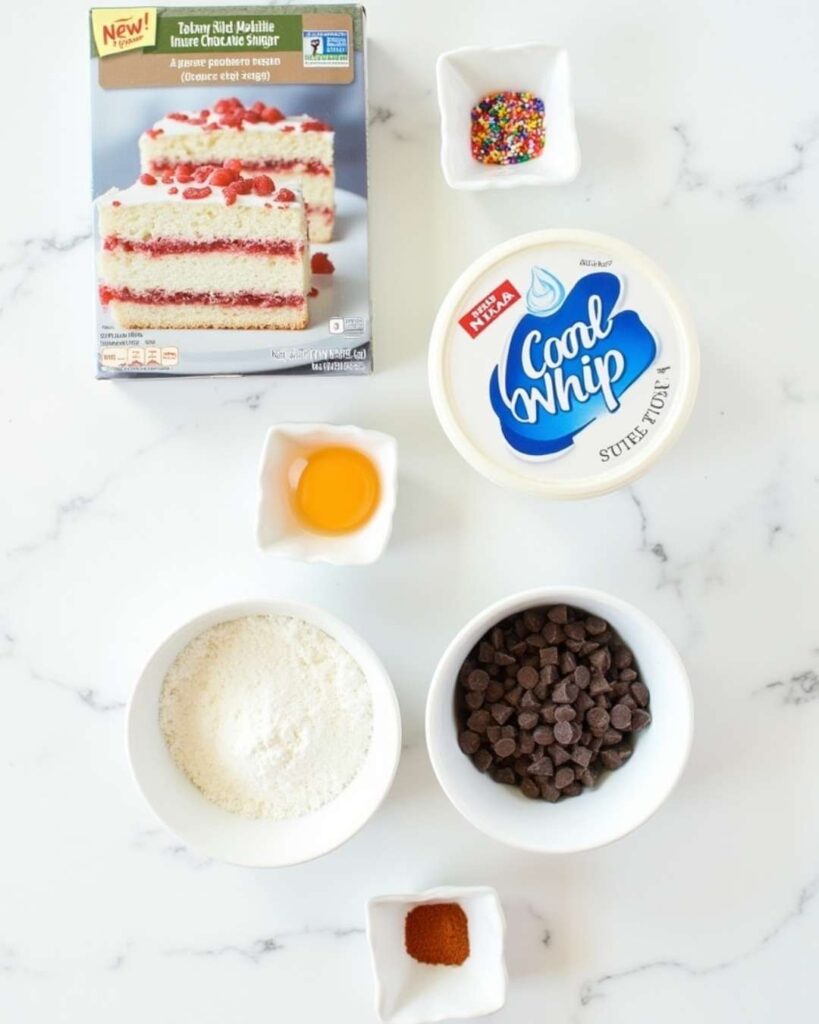
Before you begin, make sure you have the following ingredients and equipment on hand. As always, starting with everything ready to go makes the entire baking process smoother.
Essential Ingredients:
- Boxed Cake Mix (15.25 oz. package):
- Recommended Flavors: Vanilla, yellow, chocolate, lemon, or strawberry.
- Tip: Choose a flavor that complements your preferred mix-ins. For instance, chocolate cake mix with white chocolate chips, or lemon cake mix with fresh zest.
- Cool Whip (8 oz. tub):
- Note: Use the regular, full-fat variety for best results. Low-fat versions may not yield the same fluffy texture.
- Large Egg (1):
- Tip: Let the egg come to room temperature for a more uniform mixture.
- Optional Mix-Ins:
- Chocolate Chips: Semisweet, dark, or white chocolate.
- Sprinkles: Rainbow sprinkles, holiday-themed colors, or jimmies.
- Candy Pieces: Crushed peppermint, toffee bits, or chopped peanut butter cups.
- Nuts: Finely chopped almonds, pecans, or walnuts for extra crunch.
- Powdered Sugar for Rolling (about 1 cup):
- This helps prevent sticking and gives the cookies a lightly crackled, powdered finish.
Equipment and Tools:
- Large mixing bowl
- Sturdy spatula or wooden spoon
- Baking sheets lined with parchment paper or silicone baking mats
- Measuring cups and spoons
- Cooling racks
- Cookie scoop or tablespoon for portioning dough
How to Make Cake Mix and Cool Whip Cookies
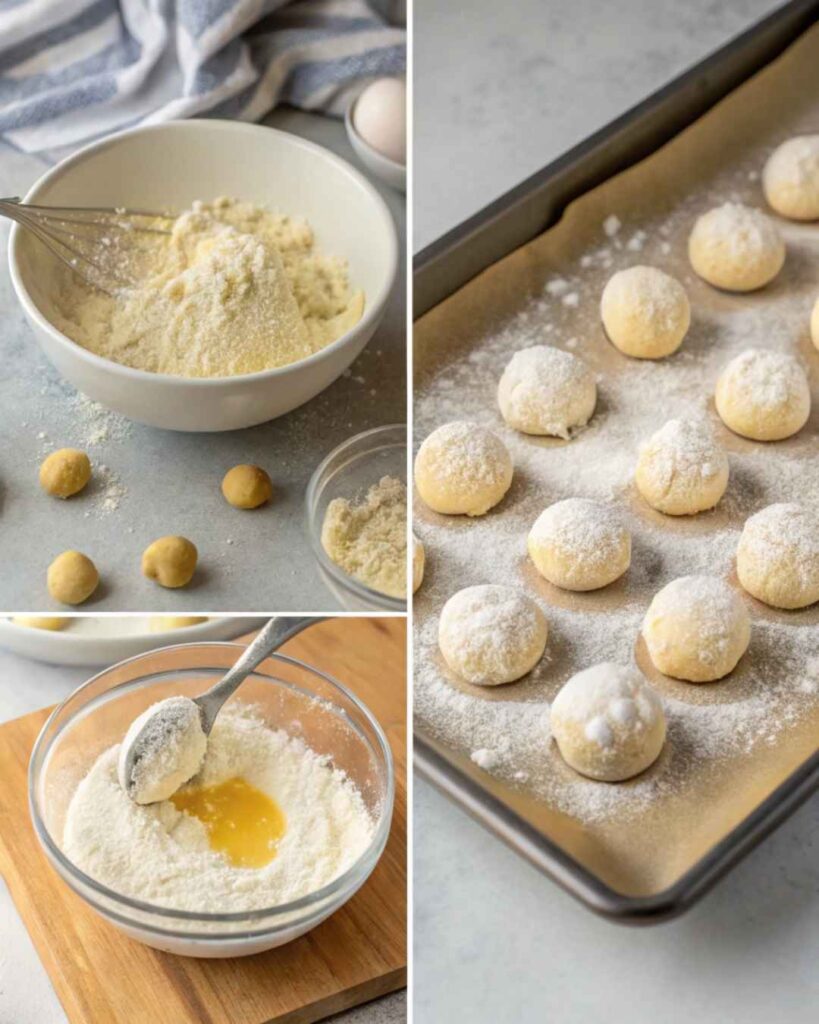
Estimated Total Time: About 20 minutes (5 minutes to mix, 10-12 minutes to bake, plus a short cooling period)
One of the greatest advantages of this recipe is its simplicity. Unlike traditional cookie dough that often needs chilling to achieve the right consistency, this cookie dough is sticky yet manageable, especially when rolled in powdered sugar. Follow these step-by-step instructions to achieve perfect results every time.
Step-by-Step Instructions
Step 1: Preheat Your Oven
- Preheat your oven to 350°F (175°C).
- Position oven racks in the center.
- Prepare two baking sheets by lining them with parchment paper or silicone baking mats.
Step 2: Combine the Wet Ingredients
- In a large mixing bowl, whisk the egg lightly to break it up.
- Add the entire tub of Cool Whip.
- Stir the egg and Cool Whip together until well combined. The mixture will be smooth and creamy.
Step 3: Add the Cake Mix
- Open your chosen cake mix and gradually add it to the bowl.
- Stir slowly and gently. The mixture will quickly thicken and become sticky. This is normal—don’t be alarmed by the unusual consistency.
- Keep mixing until no dry cake mix remains. At this point, if you’re using mix-ins like chocolate chips or sprinkles, fold them in gently.
Step 4: Shape the Dough
- Place about 1 cup of powdered sugar into a shallow bowl.
- Using a cookie scoop or a tablespoon, portion out about 1 tablespoon of dough.
- Drop the dough directly into the powdered sugar. The dough will be sticky, so the sugar makes it easier to handle.
- Roll the dough ball around in the powdered sugar until thoroughly coated.
- Transfer each coated dough ball onto your prepared baking sheet, spacing them about 2 inches apart.
Step 5: Bake Your Cookies
- Place the baking sheets in the preheated oven.
- Bake for 10-12 minutes, or until the cookies are set around the edges and slightly puffed.
- The cookies will remain somewhat soft; they should not brown significantly, but a subtle golden hue at the edges indicates they’re done.
Step 6: Cool and Serve
- Remove the cookies from the oven and let them rest on the baking sheets for about 2 minutes. This helps them set up.
- Transfer them carefully to a cooling rack to cool completely.
- As the cookies cool, they will firm up slightly but remain wonderfully soft and fluffy inside.
Serving and Storage Tips
Serving Suggestions:
- Serve Warm: These cookies are delightful when enjoyed slightly warm. The centers remain tender, and the powdered sugar crinkles beautifully for a gorgeous presentation.
- Pair with Beverages: Enjoy them alongside a cup of tea, coffee, or even a cold glass of milk. Their mild sweetness and tender crumb make them a perfect afternoon snack.
- Dessert Platter: Combine them with other homemade treats—brownies, bars, or fruit tarts—on a dessert platter for parties and gatherings.
- Festive Treats: Dress them up for special occasions by using color-themed sprinkles. Red and green sprinkles for Christmas, pastel sprinkles for Easter, or red and blue for the Fourth of July. The visual appeal elevates them from simple cookies to a festive treat.
Storage Tips:
- At Room Temperature: Store cooled cookies in an airtight container at room temperature for up to 3-4 days. Place a piece of parchment paper between layers to prevent sticking.
- Refrigeration: While refrigeration is not necessary, if you do store them in the fridge, bring them to room temperature before serving to ensure their texture remains soft and fluffy.
- Freezing: These cookies freeze exceptionally well. Once fully cooled, place them in a freezer-safe container or heavy-duty freezer bag, removing as much air as possible. They can last up to 2-3 months in the freezer. When you’re ready to enjoy them, simply thaw at room temperature.
Helpful Notes
1. Dough Consistency:
Don’t be surprised if the dough seems stickier than typical cookie dough—this is perfectly normal. The Cool Whip adds moisture and lightness, resulting in a consistency that’s more like a fluffy batter. Rolling the dough balls in powdered sugar helps them hold their shape and prevents them from sticking to your hands.
2. Adjusting the Flavor:
The beauty of this recipe lies in its adaptability. If you love citrus flavors, choose a lemon cake mix and add a teaspoon of fresh lemon zest. If you’re a chocolate lover, opt for a chocolate cake mix and fold in white chocolate chips or peanut butter chips for an indulgent twist. The base method remains the same; just tailor the flavors to match your cravings.
3. Baking Time Varies by Oven:
Every oven is slightly different, and the thickness of your cookies may vary. Check the cookies at the 10-minute mark. If they appear under-baked, give them an additional minute or two. They should look puffy and slightly crackled. Avoid over-baking, as it can dry them out and alter their fluffy texture.
4. Making Larger or Smaller Cookies:
If you prefer bigger cookies, use about 2 tablespoons of dough per cookie and add 1-2 minutes to the baking time. For miniature treats, use a teaspoon of dough and reduce the baking time by a minute or so. Always keep a close eye on them to prevent overcooking.
5. High-Altitude Adjustments:
At higher altitudes, you may need to add a tablespoon or two of additional flour if the dough is too wet. You can also adjust baking times slightly as baked goods often cook faster at higher elevations. For specific guidelines, refer to trusted baking altitude adjustment resources.
6. Food Safety:
Ensure your egg is fresh and stored properly. Always wash your hands before and after handling raw eggs and raw dough. For more safety tips, consult reputable food safety sources like FoodSafety.gov.
Conclusion
Baking cookies from scratch is a time-honored tradition, but when life gets busy (and let’s face it, it often does), having a shortcut recipe that yields scrumptious results in record time is invaluable. This Cake Mix and Cool Whip Cookies in 20 Minutes recipe is your secret weapon for effortless baking. With just a few key ingredients, minimal prep work, and virtually no fuss, you’ll be enjoying tender, fluffy cookies that taste as if they took hours to make.
The versatility of this recipe means you can easily tailor the flavors to match the season, occasion, or personal preference. Whether you’re whipping up a quick dessert for surprise guests, making a sweet treat to satisfy your late-night cravings, or simply looking for a kid-friendly baking project, these cookies deliver every time.
__________________________

Cake Mix and Cool Whip Cookies
Ingredients
Essential Ingredients:
- Boxed Cake Mix 15.25 oz. package:
- Recommended Flavors: Vanilla yellow, chocolate, lemon, or strawberry.
- Tip: Choose a flavor that complements your preferred mix-ins. For instance chocolate cake mix with white chocolate chips, or lemon cake mix with fresh zest.
Cool Whip (8 oz. tub):
- Note: Use the regular full-fat variety for best results. Low-fat versions may not yield the same fluffy texture.
Large Egg (1):
- Tip: Let the egg come to room temperature for a more uniform mixture.
Optional Mix-Ins:
- Chocolate Chips: Semisweet dark, or white chocolate.
- Sprinkles: Rainbow sprinkles holiday-themed colors, or jimmies.
- Candy Pieces: Crushed peppermint toffee bits, or chopped peanut butter cups.
- Nuts: Finely chopped almonds pecans, or walnuts for extra crunch.
Powdered Sugar for Rolling (about 1 cup):
- This helps prevent sticking and gives the cookies a lightly crackled powdered finish.
Instructions
Step 1: Preheat Your Oven
- Preheat your oven to 350°F (175°C).
- Position oven racks in the center.
- Prepare two baking sheets by lining them with parchment paper or silicone baking mats.
Step 2: Combine the Wet Ingredients
- In a large mixing bowl, whisk the egg lightly to break it up.
- Add the entire tub of Cool Whip.
- Stir the egg and Cool Whip together until well combined. The mixture will be smooth and creamy.
Step 3: Add the Cake Mix
- Open your chosen cake mix and gradually add it to the bowl.
- Stir slowly and gently. The mixture will quickly thicken and become sticky. This is normal—don’t be alarmed by the unusual consistency.
- Keep mixing until no dry cake mix remains. At this point, if you’re using mix-ins like chocolate chips or sprinkles, fold them in gently.
Step 4: Shape the Dough
- Place about 1 cup of powdered sugar into a shallow bowl.
- Using a cookie scoop or a tablespoon, portion out about 1 tablespoon of dough.
- Drop the dough directly into the powdered sugar. The dough will be sticky, so the sugar makes it easier to handle.
- Roll the dough ball around in the powdered sugar until thoroughly coated.
- Transfer each coated dough ball onto your prepared baking sheet, spacing them about 2 inches apart.
Step 5: Bake Your Cookies
- Place the baking sheets in the preheated oven.
- Bake for 10-12 minutes, or until the cookies are set around the edges and slightly puffed.
- The cookies will remain somewhat soft; they should not brown significantly, but a subtle golden hue at the edges indicates they’re done.
Step 6: Cool and Serve
- Remove the cookies from the oven and let them rest on the baking sheets for about 2 minutes. This helps them set up.
- Transfer them carefully to a cooling rack to cool completely.
- As the cookies cool, they will firm up slightly but remain wonderfully soft and fluffy inside.
Notes
Nutrition Information (Per Serving):
- Calories: ~90 kcal
- Fat: 2 g
- Carbohydrates: 16 g
- Protein: 1 g
- Sugar: ~10 g
- Fiber: <1 g
(Note: Values are approximate and depend on specific ingredients used.)
FAQs
1. Can I Use Any Flavor of Cake Mix?
Yes! That’s one of the best parts of this recipe. You can use vanilla, chocolate, lemon, red velvet, strawberry, or even specialty flavors. Just pick a cake mix that pairs well with your desired mix-ins and enjoy experimenting.
2. Do I Have to Use Cool Whip, or Can I Use Another Whipped Topping?
While Cool Whip is the most commonly used brand, you can use any store-bought whipped topping. Just make sure it’s stabilized and has a similar consistency. The key is the light, airy texture it provides. Avoid using homemade whipped cream, as it may not yield the same result.
3. My Dough Is Too Sticky. What Should I Do?
The dough is supposed to be quite sticky. However, if you find it unmanageable, you can chill it briefly (for about 15 minutes) before rolling it in powdered sugar. This step isn’t always necessary but can help if you’re working in a very warm kitchen.
4. Can I Freeze the Dough Before Baking?
Yes, you can. Scoop the dough into powdered sugar-coated balls and arrange them on a baking sheet lined with parchment. Freeze until solid, then transfer the dough balls to a freezer-safe container or bag. When you’re ready to bake, place them directly in the oven from the freezer, adding an extra 1-2 minutes of baking time.
5. How Do I Know When the Cookies Are Done Baking?
The cookies should be set on the edges and slightly puffed. They will still be soft when you remove them from the oven. Let them sit on the baking sheet for a couple of minutes, and they’ll firm up as they cool. Be careful not to over-bake, as it will compromise their tender texture.
6. Can I Make These Cookies Gluten-Free?
Yes. Look for a certified gluten-free cake mix and ensure your whipped topping and any mix-ins are also gluten-free. The texture may vary slightly, but you’ll still get a delicious, soft cookie.
7. Can I Reduce the Sugar?
The sugar content largely comes from the cake mix and powdered sugar coating. You can try using a sugar-free cake mix or a sugar-free whipped topping if available, but the flavor and texture will be different. In general, this recipe is best enjoyed in moderation as an indulgent treat.
8. Will the Powdered Sugar Dissolve After Baking?
Some of the powdered sugar may absorb into the cookie’s surface during baking, creating a delicate, crackled finish. This is normal and part of the cookie’s charm.










Thank you 🙏🙏🙏