Croissants hold a special place in breakfast traditions. Their flaky layers, buttery taste, and golden color offer a sense of comfort that people appreciate during the early hours of the day. The delight of biting into a crisp exterior and discovering a soft interior is an experience that feels both familiar and exciting. Now imagine adding a subtle pistachio flavor to that indulgence, bringing a gentle nutty touch to the dough. That is exactly what this pistachio croissant recipe aims to offer.
Pistachio croissants blend buttery layers with a sweet and earthy filling. This combination delivers a satisfying contrast of textures, making each bite feel special. Pistachios have a bright green color and a distinct taste that easily pairs with pastries. When integrated into a croissant, the end product is airy, flaky, and filled with a gentle sweetness that many find irresistible.
Croissants may seem complicated at a glance, but following a clear, step-by-step process helps simplify things. This recipe will guide you from preparing the dough to rolling out each layer, ensuring a final product that looks and tastes appealing.
These croissants are also a great way to practice working with laminated dough. Laminated dough features layers of dough and butter folded repeatedly. This creates the flaky texture that sets croissants apart from simpler breads. The addition of pistachio filling enhances the flavor profile without overwhelming the buttery nature of a classic croissant. Whether you are a home cook trying something new or an experienced baker, this recipe has something to teach about the art of pastry layering and flavor pairing.
Croissants can fit into a range of occasions. They can be the star of a weekend brunch, a treat to go with coffee, or a quick bite to enjoy later in the day. Pistachio croissants, in particular, bring a fresh spin on a long-standing favorite. They showcase a nutty taste wrapped in comforting layers of dough. While the process takes time, it is a rewarding project.
In the sections below, you will find the reasons you might love this recipe, a breakdown of the ingredients, a straightforward set of instructions, plus tips on serving, storing, and achieving the best possible outcome. Let this guide inspire you to create your own batch of pistachio croissants that will please both you and the ones you share them with.
Why You’ll Love This Recipe
- Distinct Pistachio Taste
Pistachios possess a unique flavor that goes well with pastries. The slight sweetness complements the buttery dough. This recipe highlights that natural nutty taste by incorporating pistachio paste or finely ground pistachios into both the filling and topping. - Light and Flaky Layers
One of the best parts about croissants is the airy texture. Properly folded and chilled dough creates multiple layers, leading to a flaky bite. When combined with a pistachio filling, the end result is an appealing blend of crunch and softness. - Impressive Presentation
Pistachio croissants offer a simple way to take your baking skills to a more advanced level. The bright green color of pistachios stands out against the golden pastry. This appearance draws attention, making them a good choice for special mornings or events. - Comfort Food with a Twist
Croissants already hold a beloved spot in many breakfasts. Adding a pistachio element introduces something a bit different without losing the comforting familiarity of a classic croissant. This balance of old and new can spark interest in your homemade baked goods. - Good for Gatherings
Croissants fit neatly into social settings, whether it is a brunch buffet or a small family get-together. Pistachio croissants can serve as a conversation starter because of their tasty filling. They can also be enjoyed as a personal treat on a quiet day. - Simple Instructions to Follow
Laminated dough might seem tricky, but with a direct set of steps, you can achieve a professional result in your own kitchen. You do not have to be an expert baker to get these results. Patience and clear directions will guide you through the entire process. - Freezer-Friendly Option
You can freeze croissant dough at specific points in the recipe. This lets you prepare a batch in advance and bake fresh pastries when you want them. Freshly baked croissants keep their flaky quality and warm appeal, especially when they come out of the oven at just the right time.
These features capture the main reasons why this recipe is worth trying. Each pistachio croissant carries fresh flavor, an appealing texture, and the personal satisfaction of baking something special at home.
Ingredients
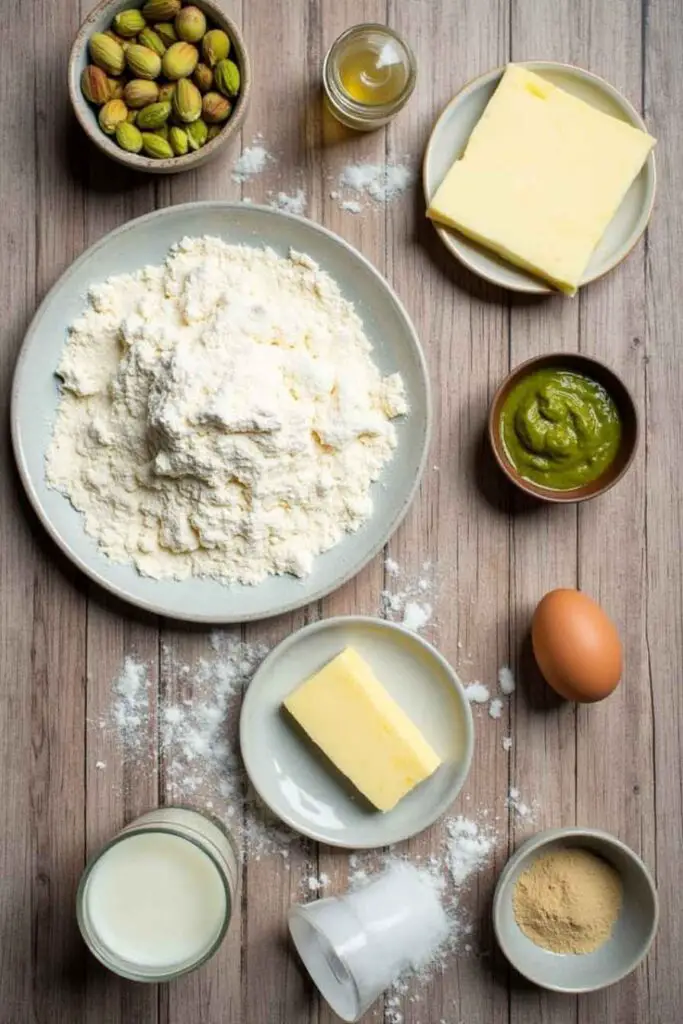
Below is a list of ingredients divided into two main parts: the dough elements and the pistachio filling. Having everything prepared beforehand will help the process go smoothly.
Dough Ingredients
- All-Purpose Flour (about 500g)
Choose a reliable brand of flour with a protein level suitable for bread or pastry dough. This helps your croissants form sturdy layers. - Unsalted Butter (about 300g total, cold)
Butter is crucial for creating layers. Some of it goes directly into the dough, and the rest is reserved for the laminating process. Select a high-quality butter because it directly affects flavor. - Granulated Sugar (50g)
Croissants are not overly sweet, but a small amount of sugar adds balance to the final dough. - Salt (1 teaspoon)
Salt provides depth and prevents the pastry from tasting flat. - Instant Yeast (10g)
Yeast is responsible for the dough rising and gaining a light texture. - Warm Water (about 120ml) + Warm Milk (about 120ml)
Combining water and milk can help with flavor and texture. Aim for a temperature that is slightly warm, but not hot, to help activate yeast.
Pistachio Filling Ingredients
- Pistachio Paste (about 150g)
Pistachio paste can be made at home or purchased. Look for a version that has minimal added sugar if possible. - Powdered Sugar (30g)
This sweetens the paste slightly, helping balance the nutty taste. - Melted Butter (2 tablespoons)
Adding a bit of butter to the pistachio filling helps it spread more easily across the dough. - Optional Add-Ons
- Finely Chopped Pistachios (for sprinkling on top)
- Extra Powdered Sugar (for dusting after baking)
Egg Wash (Optional)
- Egg (1 large)
This is mixed with a small amount of milk or water. Brushing the croissants with egg wash before baking promotes a golden color.
How to Make Pistachio Croissant Recipe
This process involves multiple stages: dough preparation, butter lamination, shaping, filling, and baking. Be sure to account for rest periods, as letting the dough chill is vital for achieving flaky layers.
A. Prepare the Dough
- Activate the Yeast
In a medium bowl, combine the warm water, warm milk, and sugar. Stir gently until the sugar dissolves. Add the instant yeast to this mixture. Let it rest for about 5 minutes. If you are using active dry yeast, wait until it foams slightly. This confirms the yeast is active. - Combine Dry Ingredients
In a mixing bowl, stir together the flour and salt. Create a small well in the middle of the flour mixture. - Incorporate the Liquid
Slowly pour the yeast mixture into the well while stirring the flour with a wooden spoon. Add a small portion of softened butter (around 50g) into the dough at this point to enrich it. Knead gently by hand or use a stand mixer with a dough hook on low speed. The dough should form a smooth ball that is slightly elastic but not overly sticky. If it is too sticky, add a bit more flour, one tablespoon at a time. If it is too dry, add small splashes of warm water. - First Rise
Shape the dough into a ball and place it in a lightly greased bowl. Cover with plastic wrap or a clean towel. Let it rise in a warm area for about 1 to 1.5 hours or until it approximately doubles in size.
B. Create the Butter Block
- Prepare Butter for Laminating
Take the remaining butter (around 250g). Place it on a sheet of parchment paper or plastic wrap. Shape it into a rectangular slab, about 6×8 inches (15x20cm) in size. To do this, you can pound or flatten the butter using a rolling pin, folding edges of the paper over to keep it in place. - Chill the Butter
Once shaped, place the butter block in the refrigerator for at least 30 minutes. It needs to be cold but still flexible, so it can fold into the dough without breaking.
C. Laminate the Dough
- Roll Out the Dough
After the first rise, punch down the dough to release air. Transfer it onto a lightly floured surface. Roll it into a large rectangle, approximately twice the size of your butter block. - Enclose the Butter
Place the chilled butter block in the center of the dough. Fold the left side of the dough over the butter, then fold the right side over, covering the butter block completely. The butter should now be sealed inside the dough. - First Fold
Roll the dough gently in one direction to stretch it slightly. Fold it like a letter: fold one third of the dough inward, then fold the opposite third on top. Wrap the dough in plastic wrap and place it in the refrigerator for about 30 minutes to 1 hour. This step helps the dough relax and keeps the butter cold. - Second Fold
Take the chilled dough out and place it back on a floured surface. Rotate it 90 degrees from its original position. Roll it out again into a rectangle. Repeat the letter fold as before. Wrap it again, and let it chill for another 30 minutes to 1 hour. - Third Fold
Some bakers prefer a third fold to create extra layers. Follow the same steps: roll, fold, wrap, and chill. Each fold multiplies the layers, creating a flaky texture.
D. Shape and Fill the Croissants
- Roll the Dough for Shaping
After the final fold, let the dough rest in the refrigerator for at least 1 hour. Then, place it on a lightly floured surface and roll it out to a rectangle about 8×20 inches (20x50cm). Aim for a thickness of about ¼ inch (6mm). - Cut Triangles
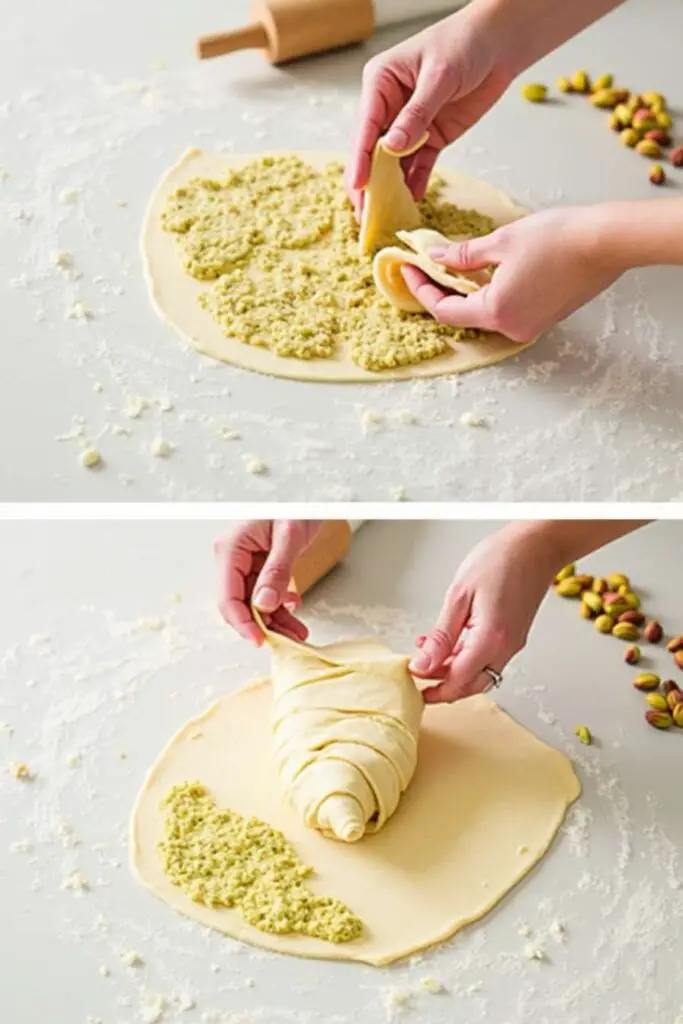
Use a sharp knife or a pizza cutter to create long triangles. Each triangle base can be around 3 to 4 inches (7.5 to 10cm) wide, depending on how large you want your croissants. - Prepare the Pistachio Filling
Mix the pistachio paste, powdered sugar, and melted butter in a bowl. Stir until you have a smooth spread. If you want a thicker filling, add more pistachio paste or a spoonful of almond flour. If the mixture is too thick, add a small splash of milk. - Fill the Triangles
At the base of each triangle, place a small spoonful of pistachio filling. Spread it slightly so it does not clump up in one spot. Be careful not to push it too close to the edges. This avoids leaking while rolling. - Roll the Croissants
Starting from the wide base, roll the triangle up toward the tip. As you roll, try to keep the dough snug, but do not press down too hard. You want to maintain the layers. The tip should be tucked under the croissant to avoid unrolling during baking. - Second Rise
Place the croissants on a baking sheet lined with parchment paper, leaving enough space between them for expansion. Cover loosely with plastic wrap or a clean cloth. Let them rise in a warm area for 1 to 2 hours, or until they appear slightly puffy.
E. Bake to Perfection
- Egg Wash
If you want a shiny, golden finish, whisk the egg with a small amount of water or milk. Gently brush the tops of the croissants, avoiding heavy drips on the sides, which can seal the layers. - Oven Setup
Preheat your oven to 375°F (190°C). Ensure your rack is in the center. - Baking Process
Place the croissants in the preheated oven. Bake for about 15 to 20 minutes, or until they are golden brown. This timing can vary slightly, so keep an eye on them to avoid over-browning. - Add Pistachio Garnish
If desired, sprinkle chopped pistachios on top during the last few minutes of baking. This adds a fun crunch and a bright green pop. Watch them closely so they do not burn. - Cool and Enjoy
Remove the baking tray from the oven and allow the croissants to cool on a wire rack. The pastry layers continue to set during this cooling period. For the best taste, enjoy them warm.
Serving and Storage Tips
- Serving Suggestions
- Breakfast Treat: Pair these pistachio croissants with a hot cup of coffee or tea. The warm beverage complements the buttery dough and nutty flavor.
- Brunch Spread: Serve alongside fresh fruit, yogurt, or light savory items like a simple omelet. This creates a balanced meal with both sweet and savory elements.
- Midday Snack: Heat a leftover croissant in the oven for a few minutes. It makes a cozy pick-me-up.
- Storage Guidelines
- Room Temperature: These croissants can stay fresh on the counter for about 2 days. Store them in a paper bag or a container with a loose cover to maintain some crispness.
- Refrigeration: If you plan to keep them longer than 2 days, place them in the fridge. However, the texture may lose some crispness. Gently reheat them in a low-temperature oven (around 300°F or 150°C) for a few minutes.
- Freezing the Dough: You can freeze the shaped, unbaked croissants on a tray lined with parchment paper. Once frozen, transfer them to a freezer-safe bag or container. Thaw overnight in the fridge, let them rise at room temperature, and bake fresh. This makes it easy to have a supply of pastries ready to bake.
- Freezing Baked Croissants: If you have leftover baked croissants, you can freeze them as well. Wrap each croissant in plastic wrap or foil, and place them in a freezer-safe container or bag. When ready to enjoy, thaw them overnight in the fridge and then warm them in the oven until heated through.
Helpful Notes
- Ensuring a Good Butter Block
The step of creating a uniform butter slab is key. If the butter is too soft, it will merge with the dough instead of forming separate layers. If it is too firm, it might tear the dough during rolling. - Chilling is Vital
Extended rest times in the refrigerator help the dough keep its structure. Cold dough rolls out more smoothly and keeps the butter contained. This also reduces the risk of the butter leaking out. - Use the Right Flour
All-purpose flour is often a good choice. If you want a slightly stronger structure, you can blend in a bit of bread flour. Still, be mindful not to pick a flour that is too heavy, as it can compromise the flaky texture. - Do Not Rush
The folding and chilling process might look lengthy, but each step is important. This is how you get the signature layers in croissants. Skipping or shortening the chill time often leads to a finished product without the desired flakiness. - Working in a Cool Environment
If you are in a warm climate, your dough and butter can soften quickly. If that happens, return the dough to the fridge more often. Keep your tools and rolling pin cool, if possible. - Adjusting Sweetness
The sugar level in this recipe is moderate. If you prefer a sweeter croissant, increase the sugar in the dough by a small amount. If your pistachio paste has added sugar, consider reducing the powdered sugar in the filling to avoid an overly sweet result. - Alternative Nut Options
If you have a different nut preference, you can swap pistachios for almonds or hazelnuts. However, the bright taste of pistachios is what makes this recipe special. Still, it is fun to experiment if you enjoy variety. - Freshness of Yeast
Make sure to check the expiration date on your yeast. Expired or stale yeast can cause poor rising. Fresh yeast gives your dough the lift needed to create airy layers. - Extra Toppings
If you love the flavor of pistachios, you can garnish each croissant with a drizzle of homemade pistachio cream after baking. For a sweeter finish, dust them with powdered sugar. For a fancier look, consider a small line of melted white chocolate and then sprinkle chopped pistachios on top. - Patience with Rolling
Roll your dough steadily, applying even pressure. Do not push down too hard, as it may stretch the dough unevenly. If you see lumps of butter breaking through, lightly dust with flour and slow down. A gentle approach ensures an even spread of butter layers.
Conclusion
Pistachio croissants are a rewarding project that combines the buttery quality of classic croissants with the subtle sweetness of pistachio. This recipe provides detailed steps, from mixing the dough to rolling and folding, ensuring that each layer is created with care. Laminated dough may call for patience, but it is a satisfying journey. The final outcome offers crisp, golden layers on the outside and a soft interior, highlighted by a sweet and nutty filling.
The pistachio aspect brings a fresh angle to the typical croissant. The color contrast is appealing, and the flavor captures a balance between sweet and rich. Whether you share them at a brunch, serve them as an afternoon snack, or keep a secret stash in your freezer for special moments, these pastries brighten up any table. You can also adapt the level of sweetness or the garnishes to match personal preferences, making it a flexible recipe.
Always remember to follow the recommended chill times, because those pauses keep the dough and butter separate. That is the key to the signature flaky layers people expect from a perfect croissant. Sticking to the correct steps, like forming a neat butter slab and folding the dough carefully, is a big part of success. If you are in a warmer environment, get comfortable with taking extra breaks to ensure everything stays cool.
Creating pistachio croissants at home is a step toward refining your pastry skills. It may look like a big project at first, but each stage builds on the one before it, guiding you closer to a bakery-inspired treat. The process encourages you to respect the artistry behind a well-made croissant while adding a personal spin in the form of pistachio flavor. Feel free to personalize small details, like the amount of sugar in the filling, the shape of the final pastries, or the types of toppings you sprinkle on.
Once you master this pistachio croissant recipe, you will have a foundation to try other variations. Maybe you will explore almond croissants or chocolate-filled ones next. Yet the charm of pistachio is hard to beat, thanks to its gentle sweetness and vibrant color. Your family, friends, or guests are likely to admire the professional-looking results. More important, you will take pride in knowing you created these nutty, flaky croissants from scratch.
Enjoy the process, follow the steps, and look forward to that warm, welcoming aroma filling your kitchen as these pistachio croissants bake to perfection. Let their soft layers and bright flavor remind you that baking, while it requires patience, is one of the most fulfilling ways to create something special. From the crisp edges to the light interior, each bite celebrates the taste of homemade pastry with a unique pistachio touch.
__________________________

Pistachio Croissant Recipe
Ingredients
Dough Ingredients
- 500 g All-Purpose Flour
- 300 g Unsalted Butter cold, divided
- 50 g Granulated Sugar
- 1 tsp Salt
- 10 g Instant Yeast
- 120 ml Warm Water
- 120 ml Warm Milk
Pistachio Filling Ingredients
- 150 g Pistachio Paste
- 30 g Powdered Sugar
- 2 tbsp Melted Butter
Optional Add-Ons
- Finely Chopped Pistachios for garnish
- Extra Powdered Sugar for dusting
Egg Wash (Optional)
- 1 Large Egg beaten
- 1 tbsp Water or Milk
Instructions
1. Prepare the Dough
- Activate the Yeast:– In a medium bowl, combine the warm water, warm milk, and sugar. Stir gently until the sugar dissolves. Add the instant yeast to this mixture. Let it rest for about 5 minutes. If you are using active dry yeast, wait until it foams slightly. This confirms the yeast is active.
- Combine Dry Ingredients:– In a mixing bowl, stir together the flour and salt. Create a small well in the middle of the flour mixture.
- Incorporate the Liquid:– Slowly pour the yeast mixture into the well while stirring the flour with a wooden spoon. Add a small portion of softened butter (around 50g) into the dough at this point to enrich it. Knead gently by hand or use a stand mixer with a dough hook on low speed. The dough should form a smooth ball that is slightly elastic but not overly sticky. If it is too sticky, add a bit more flour, one tablespoon at a time. If it is too dry, add small splashes of warm water.
- First Rise:– Shape the dough into a ball and place it in a lightly greased bowl. Cover with plastic wrap or a clean towel. Let it rise in a warm area for about 1 to 1.5 hours or until it approximately doubles in size.
2. Create the Butter Block
- Prepare Butter for Laminating:– Take the remaining butter (around 250g). Place it on a sheet of parchment paper or plastic wrap. Shape it into a rectangular slab, about 6×8 inches (15x20cm) in size. To do this, you can pound or flatten the butter using a rolling pin, folding edges of the paper over to keep it in place.
- Chill the Butter:– Once shaped, place the butter block in the refrigerator for at least 30 minutes. It needs to be cold but still flexible, so it can fold into the dough without breaking.
3. Laminate the Dough
- Roll Out the Dough:– After the first rise, punch down the dough to release air. Transfer it onto a lightly floured surface. Roll it into a large rectangle, approximately twice the size of your butter block.
- Enclose the Butter:– Place the chilled butter block in the center of the dough. Fold the left side of the dough over the butter, then fold the right side over, covering the butter block completely. The butter should now be sealed inside the dough.
- First Fold:– Roll the dough gently in one direction to stretch it slightly. Fold it like a letter: fold one third of the dough inward, then fold the opposite third on top. Wrap the dough in plastic wrap and place it in the refrigerator for about 30 minutes to 1 hour. This step helps the dough relax and keeps the butter cold.
- Second Fold:– Take the chilled dough out and place it back on a floured surface. Rotate it 90 degrees from its original position. Roll it out again into a rectangle. Repeat the letter fold as before. Wrap it again, and let it chill for another 30 minutes to 1 hour.
- Third Fold:– Some bakers prefer a third fold to create extra layers. Follow the same steps: roll, fold, wrap, and chill. Each fold multiplies the layers, creating a flaky texture.
4. Shape and Fill the Croissants
- Roll the Dough for Shaping:– After the final fold, let the dough rest in the refrigerator for at least 1 hour. Then, place it on a lightly floured surface and roll it out to a rectangle about 8×20 inches (20x50cm). Aim for a thickness of about ¼ inch (6mm).
- Cut Triangles:– Use a sharp knife or a pizza cutter to create long triangles. Each triangle base can be around 3 to 4 inches (7.5 to 10cm) wide, depending on how large you want your croissants.
- Prepare the Pistachio Filling:– Mix the pistachio paste, powdered sugar, and melted butter in a bowl. Stir until you have a smooth spread. If you want a thicker filling, add more pistachio paste or a spoonful of almond flour. If the mixture is too thick, add a small splash of milk.
- Fill the Triangles:– At the base of each triangle, place a small spoonful of pistachio filling. Spread it slightly so it does not clump up in one spot. Be careful not to push it too close to the edges. This avoids leaking while rolling.
- Roll the Croissants:– Starting from the wide base, roll the triangle up toward the tip. As you roll, try to keep the dough snug, but do not press down too hard. You want to maintain the layers. The tip should be tucked under the croissant to avoid unrolling during baking.
- Second Rise:– Place the croissants on a baking sheet lined with parchment paper, leaving enough space between them for expansion. Cover loosely with plastic wrap or a clean cloth. Let them rise in a warm area for 1 to 2 hours, or until they appear slightly puffy.
5. Bake to Perfection
- Egg Wash:– If you want a shiny, golden finish, whisk the egg with a small amount of water or milk. Gently brush the tops of the croissants, avoiding heavy drips on the sides, which can seal the layers.
- Oven Setup:– Preheat your oven to 375°F (190°C). Ensure your rack is in the center.
- Baking Process:– Place the croissants in the preheated oven. Bake for about 15 to 20 minutes, or until they are golden brown. This timing can vary slightly, so keep an eye on them to avoid over-browning.
- Add Pistachio Garnish:– If desired, sprinkle chopped pistachios on top during the last few minutes of baking. This adds a fun crunch and a bright green pop. Watch them closely so they do not burn.
- Cool and Enjoy:– Remove the baking tray from the oven and allow the croissants to cool on a wire rack. The pastry layers continue to set during this cooling period. For the best taste, enjoy them warm.
Notes
- Calories: 300 kcal
- Total Fat: 18g
- Saturated Fat: 10g
- Cholesterol: 45mg
- Sodium: 180mg
- Total Carbohydrates: 30g
- Dietary Fiber: 2g
- Sugars: 6g
- Protein: 6g
Explore More Delicious Recipes
If you enjoyed diving into the Pistachio Croissant Recipe, why not explore more delightful dishes from our collection? Here are some must-try recipes to elevate your cooking adventures:
- Passover Potato Pie: A hearty and savory pie perfect for Passover celebrations.
- Sourdough Coffee Cake Recipe: A moist and flavorful coffee cake made with sourdough discard.
- Sourdough Discard Pancakes Recipe: Fluffy and delicious pancakes that make the most of sourdough discard.
- Ritz Cracker Chicken Casserole: A creamy and crunchy casserole that’s a crowd-pleaser.
- Creamy Garlic Parmesan Chicken Recipe: A rich and flavorful chicken dish that’s perfect for dinner.
Explore these recipes today to bring more exciting flavors to your table and make every meal memorable!
FAQs
1. What Makes a Pistachio Croissant Recipe Different from a Regular Croissant?
A pistachio croissant recipe features a nutty and subtly sweet pistachio filling layered within the flaky croissant dough. This adds extra flavor, color, and texture compared to a plain croissant, making it a more distinctive and indulgent pastry option.
2. Can I Use Store-Bought Croissant Dough for This Recipe?
Yes, you can use store-bought croissant dough as a shortcut. However, making homemade laminated dough provides better control over layering, resulting in a flakier pastry and more consistent pistachio flavor distribution.
3. What Kind of Pistachios Work Best for the Filling?
Choose unsalted, shelled pistachios for optimal taste. You can use raw or lightly roasted pistachios. Grind them finely or use a pistachio paste to achieve a smooth, spreadable filling that infuses each bite with nutty sweetness.
4. Do I Need Special Equipment to Make Pistachio Croissants?
A rolling pin, a baking sheet, and parchment paper are usually enough for most home bakers. A stand mixer with a dough hook can simplify the kneading process, but you can still achieve good results by kneading the dough by hand.
5. How Long Can I Store Baked Pistachio Croissants?
Keep baked pistachio croissants at room temperature in a loosely covered container for up to two days. For longer storage, freeze them in a sealed container for up to one month. Reheat gently in the oven to restore crispness.
6. Can I Make the Pistachio Filling Less Sweet?
Absolutely. If you prefer a subtle sweetness, reduce the powdered sugar in the filling. You may also use unsweetened pistachio paste and adjust the overall sweetness by adding a smaller amount of sugar or honey.
7. How Can I Ensure a Flaky Texture When Laminating the Dough?
Chill the dough and butter block thoroughly before rolling and folding. Maintaining cold temperatures helps preserve distinct layers of dough and butter. Avoid overworking the dough and allow sufficient rest times between folds for the best flaky results.