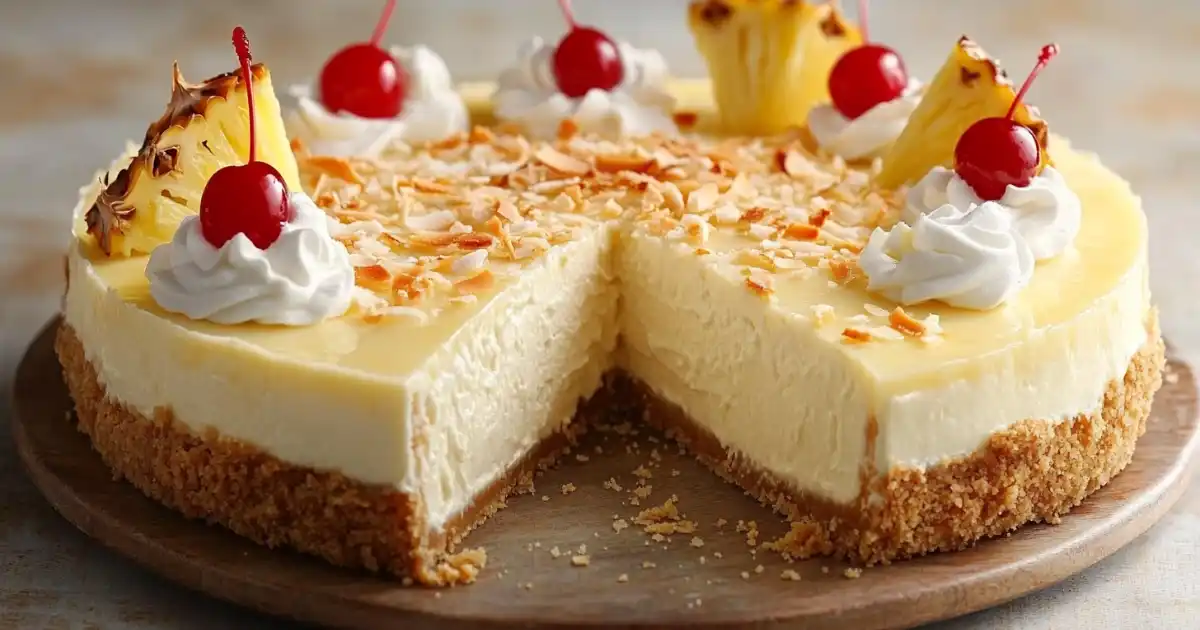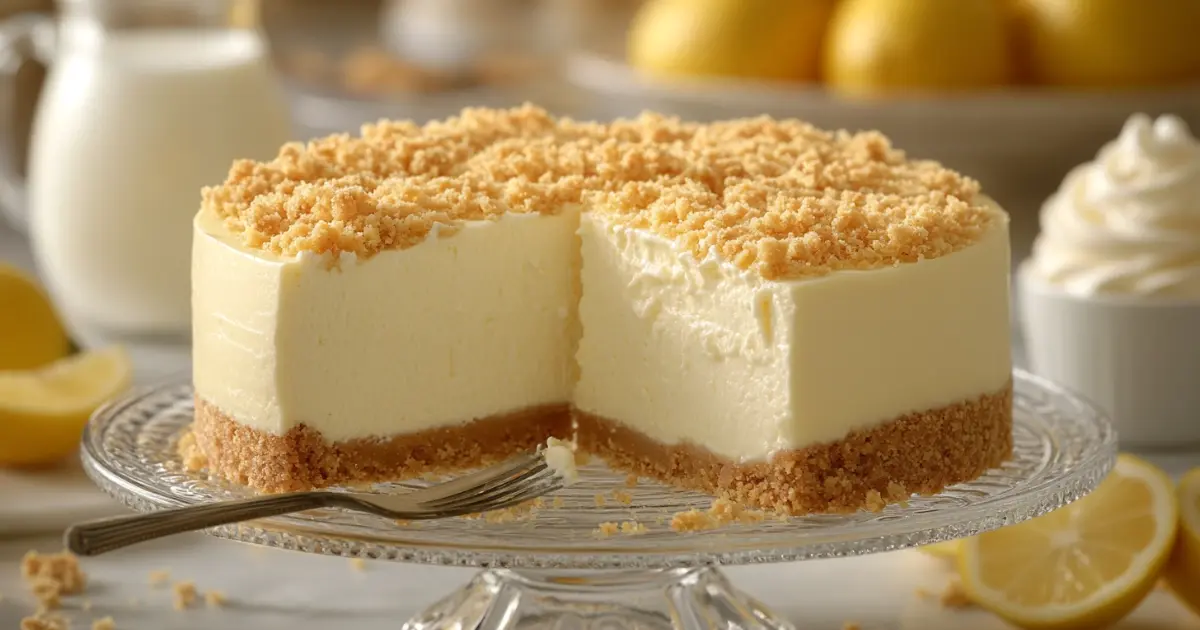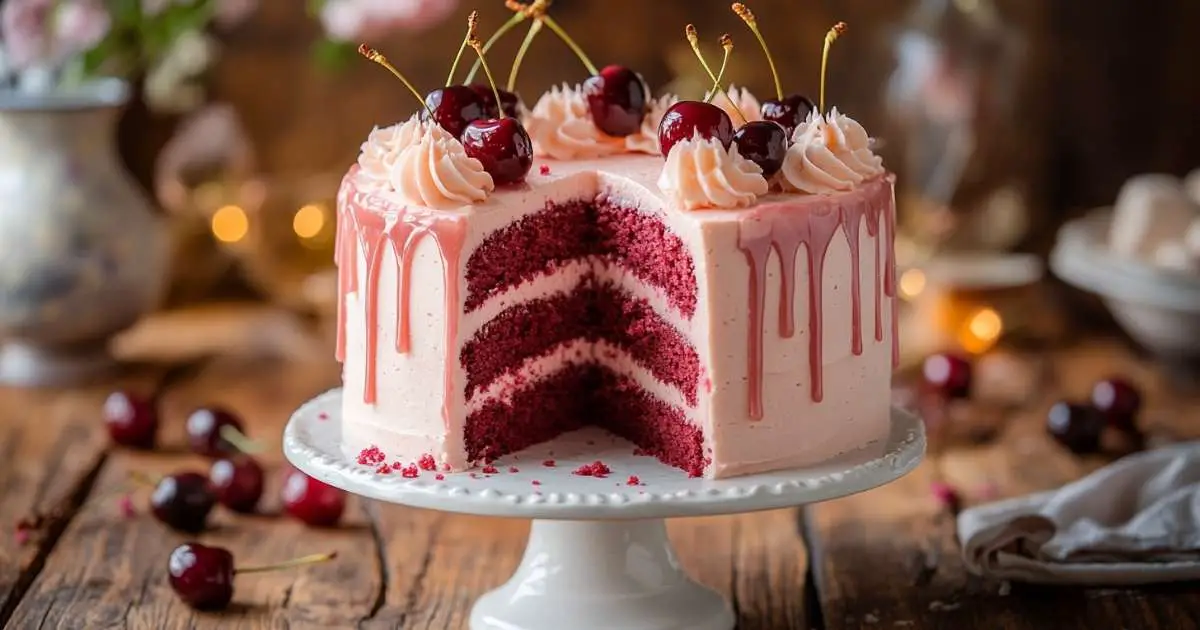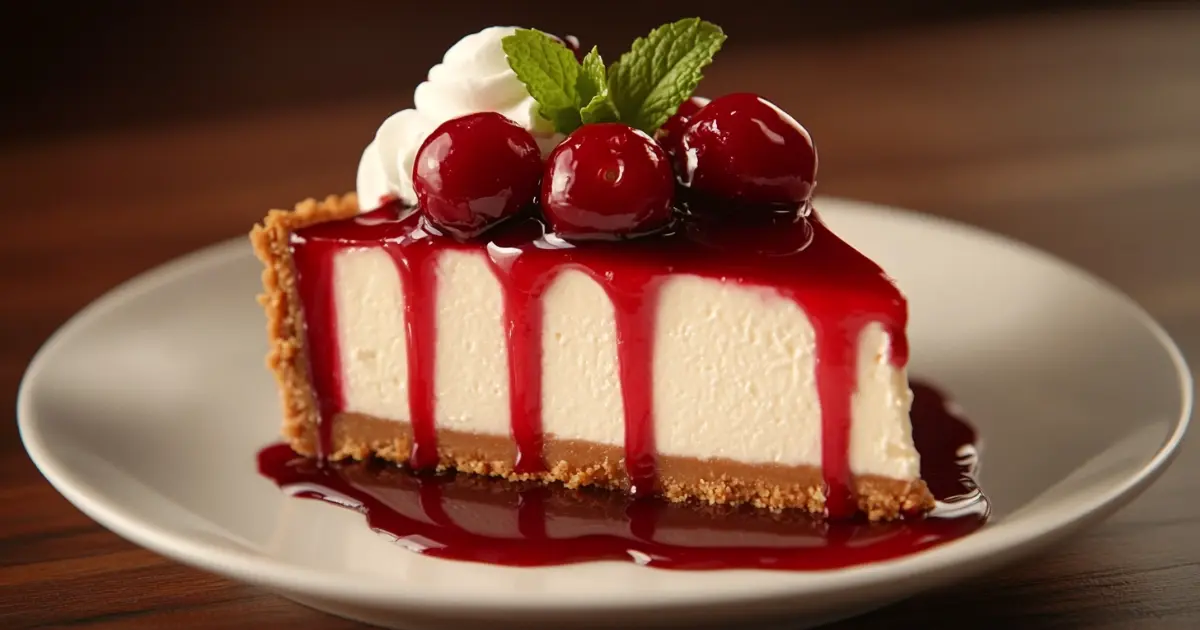
No bake cherry cheesecake is a favorite treat for many home cooks. It’s a no bake option that offers a creamy texture and sweet cherry topping, without the need for an oven. This easy no bake cherry cheesecake blends smooth cream cheese and whipped topping to form a lush filling that sits on a crisp crust. It’s so easy to make and doesn’t take much time to assemble, yet looks so yummy when served at gatherings.
If you love cheesecake but want to avoid long baking sessions, this recipe is an ideal pick. In the following guide, you will find a step-by-step approach to prepare a classic dessert that feels fancy but remains simple. Let’s explore how to make this easy recipe at home.
Why You’ll Love This Recipe
Folks often enjoy a bake cherry cheesecake recipe, but sometimes it’s nice to avoid turning on the oven. That’s where this no bake cherry cheesecake dessert steps in. The creamy filling has a light tang from full-fat cream cheese, which contrasts well with the sweetness of cherry pie filling on top. Because it’s a no-bake cheesecake, you sidestep the complexities of water baths and worry over cracks that can happen with a traditional cheesecake. You also skip a bake graham cracker crust, making it even simpler.
Many readers say this is their favorite cheesecake because the smooth layers bring comfort without extra steps. Once you make this easy no bake cherry cheesecake, you’ll realize it’s a crowd-pleaser for any event, from holiday dinners to casual potlucks. This delightful treat is also versatile. You could add raspberry sauce or swirl in other pie fillings if you like to experiment. In short, it’s a go-to choice if you think cheesecake can only come from the oven. With this recipe, you’ll see how a great dessert can be done quickly while still impressing friends and family.
Ingredients for No Bake Cherry Cheesecake Recipe
Below is the full recipe list you’ll need to gather:
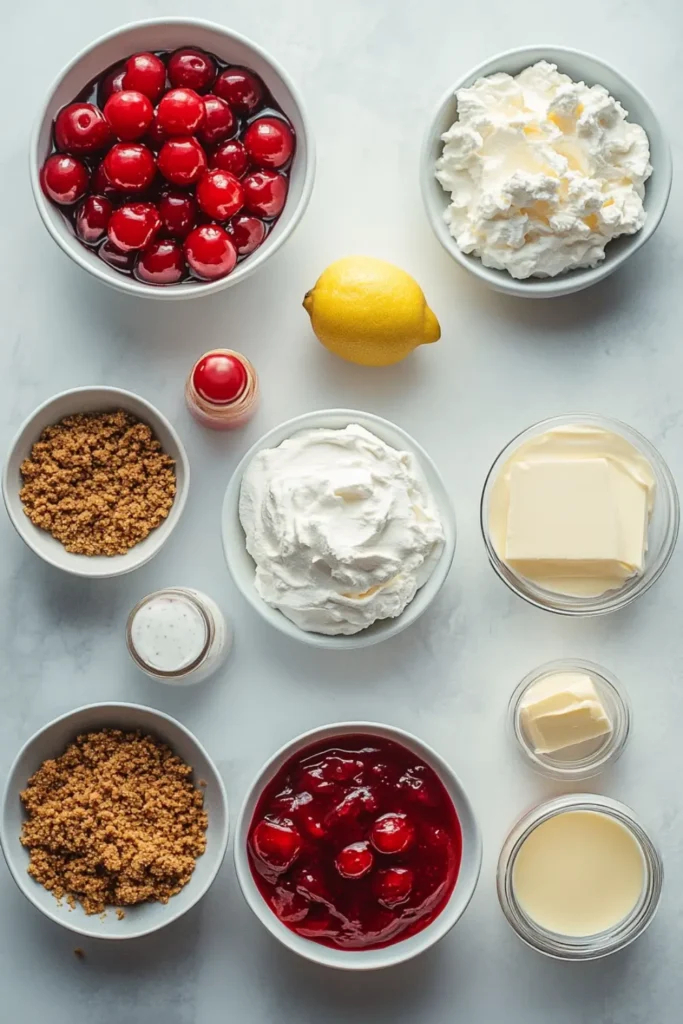
- Cream Cheese (16 ounces total)
- Use softened cream cheese for the best blending results. You can choose either full-fat cream cheese or low-fat cream cheese, but the full-fat option makes a thicker, creamier texture.
- Cool Whip (8 ounces)
- This whipped topping keeps the filling light. If you don’t have Cool Whip, you can use another whipped topping or whip cream yourself.
- Condensed Milk (14 ounces)
- The recipe calls for sweetened condensed milk to give the cheesecake layer extra richness.
- Lemon Juice (2 tablespoons)
- Lemon juice adds brightness to the filling and helps it set better. Without it, the filling might not set as firmly.
- Cherry Pie Filling (about 21 ounces)
- This cherry topping goes right on the finished cheesecake layer. If you like variety, homemade cherry pie filling is a nice option.
- Graham Cracker Crumbs (about 1½ cups)
- You can buy them pre-crushed or break up graham crackers yourself. A food processor makes it quick, but a zip-top bag and rolling pin also work.
- Melted Butter (5 tablespoons)
- Combine melted butter with crumbs to form the base of your crust.
- Cup of Sugar (¼ cup) – Optional
- Some folks like a sweeter crust. You can add sugar to the graham cracker mixture if you prefer.
That’s the list of core items needed to make this easy and delicious treat.
How to Make No Bake Cherry Cheesecake Recipe
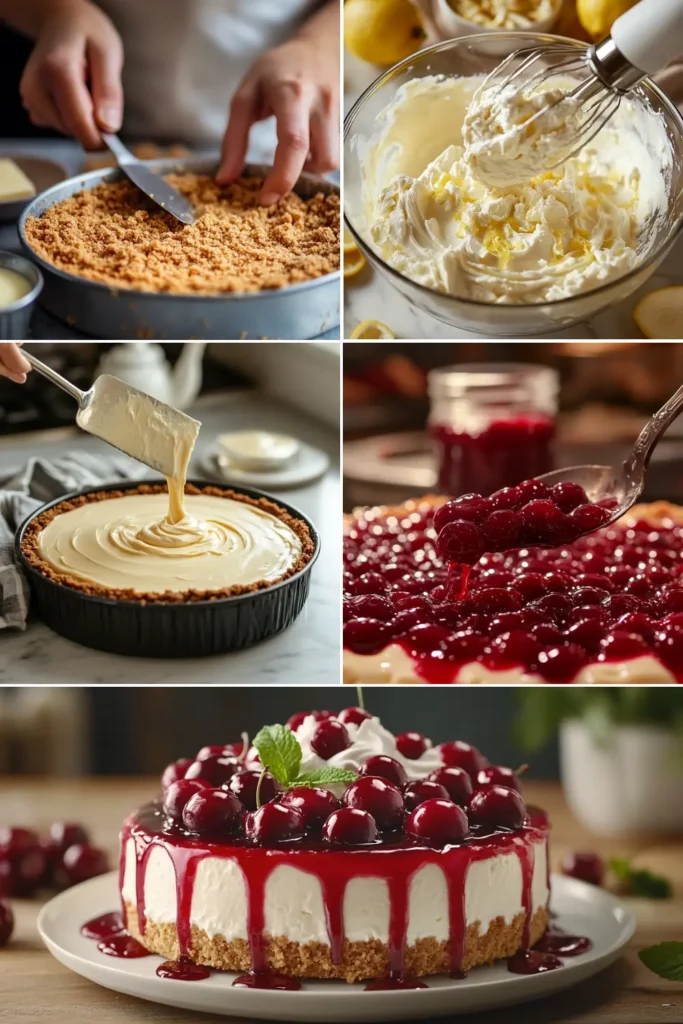
1. Make the Crust
- Gather Your Graham Crackers
- You need about 1½ cups of graham cracker crumbs. If you have whole graham crackers, pulse them in a food processor. This is a quick way to get a fine crumb. You can also place them at the bottom of a flat surface, cover with plastic wrap, and crush them with a rolling pin.
- Combine with Melted Butter
- Pour the crumbs into a mixing bowl. Stir in 5 tablespoons of melted butter. If you like a sweeter base, add up to ¼ cup of sugar to the mixture. This mixture is sometimes referred to as a graham cracker mixture.
- Form the Crust
- Lightly grease a 9-inch springform pan or a square baking dish. Next, press the graham mixture into the bottom. Use the back of a flat measuring cup or spoon for an even layer. This step is crucial because the crust needs to be packed firmly to hold the filling.
2. Create the Cheesecake Filling
- Prep Your Ingredients
- Before you start, be sure you have softened cream cheese ready. A stand or electric mixer is best for blending.
- Blend the Cream Cheese and Condensed Milk
- In a large mixing bowl, place 16 ounces of cream cheese, 14 ounces of condensed milk, and lemon juice. Use your mixer on medium speed to combine until the mixture is smooth. The lemon juice helps firm up the no-bake cheesecake filling.
- Fold in Whipped Topping
- Gently fold in your Cool Whip. This step ensures the filling remains airy. Overmixing can break down the whipped topping, so stir just until it’s integrated. You want a creamy cheesecake filling without lumps.
3. Assemble the Layers
- Spread the Filling
- Spoon the cheesecake layer over the crust. Make sure it’s even across the top.
- Set and Chill
- Cover the dish with plastic wrap. Move it to the fridge for at least four hours, or overnight for the easiest cheesecake to slice. This waiting time is important to allow the cheesecake to set. If you rush, it might not set firmly.
- Add the Cherry Topping
- After it sets, remove the covering. Gently spread your cherry pie filling or homemade cherry pie filling over the top of the cheesecake. This is your bright and tangy cherry topping layer.
4. Optional Flavor Twists
- Raspberry
- Replace the cherry layer with raspberry sauce for a fresh take.
- Pie Fillings Variety
- Try strawberry or blueberry pie fillings if you like.
- Garnishes
- You can pipe extra whipped topping around the edges or sprinkle mini chocolate chips.
At this point, you have a no-bake cherry cheesecake that’s creamy, sweet, and ready to enjoy.
Serving and Storage Tips
Serving Suggestions
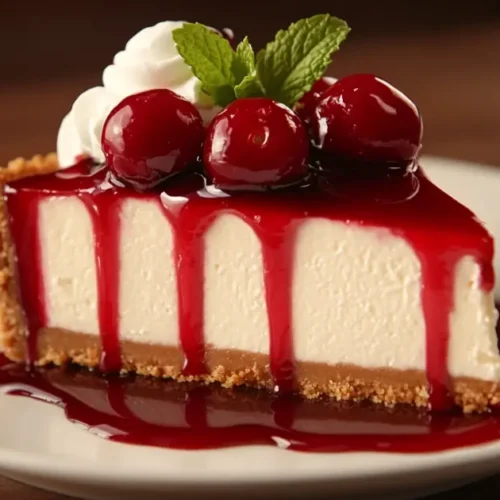
- Slice your no-bake cheesecake with a clean, sharp knife. Wipe the blade after each cut for neat slices.
- This dessert works well at potlucks, family dinners, or birthday celebrations. Because it’s so straightforward to make, you can prepare it ahead and keep it chilled until ready to serve.
- For added flair, garnish slices with a swirl of whipped topping, fresh cherries, or even a small mint leaf.
Storage Tips
- Refrigeration: Keep leftovers in the fridge, covered. A dish with plastic wrap or a tight-fitting lid is helpful. The cheesecake can stay fresh for up to four days.
- Freezing: If you want a longer lifespan, place slices in a freezer-safe container. Freeze for up to two weeks. When you’re ready to enjoy, move it to the fridge to thaw overnight.
- If you use a springform pan, you can wrap the entire dessert to maintain freshness. Just be sure to keep the cherry topping from smearing by covering gently.
USDA Food Safety and Inspection Service – Refrigeration and Food Safety: This guide provides comprehensive information on safe refrigeration practices, including proper temperatures and storage durations to prevent foodborne illnesses.
Helpful Notes
No-Bake Simplicity vs. Traditional Baking
Love cheesecake but not the hassle of baking? This no-bake cherry cheesecake is the perfect solution. While traditional baked cheesecakes have a dense texture and require precise baking techniques, this no-bake version delivers a creamy, airy filling with minimal effort—ideal for beginners and busy home cooks.
Getting the Perfect Crust
A graham cracker crust forms the foundation of this dessert. Press the crumb mixture firmly into the pan to ensure a solid base that holds its shape. If you prefer a thicker crust, increase the graham cracker crumbs slightly and add an extra tablespoon of melted butter. A 9-inch springform pan is best for easy slicing, but a square baking dish works just as well.
Cream Cheese Consistency Matters
For a smooth, lump-free filling, use softened cream cheese at room temperature. Cold cream cheese won’t blend properly, leading to an uneven texture. If your mixture seems too runny, refrigerate it for a short time before spreading it over the crust. The lemon juice in the filling also plays a key role in helping it set.
Chilling for the Best Results
Patience is key! Let your cheesecake chill for at least four hours, though overnight is even better. This ensures the filling firms up properly for clean slices. Skipping this step may result in a soft, unstable texture that won’t hold its shape.
Topping & Flavor Variations
While cherry pie filling is a classic topping, feel free to get creative! Try raspberry, blueberry, or strawberry pie filling for a fruity twist. Want more indulgence? Garnish with whipped cream, chocolate shavings, or a drizzle of caramel sauce for extra flavor.
Conclusion
A no bake cherry cheesecake is the perfect dessert when you’re short on time but still craving a sweet fix. It’s a dish that can fit any occasion, from birthdays to weekend treats. The layers of crust, creamy cheesecake filling, and fruity cherry topping offer a fun blend of flavors and textures. Plus, this recipe is flexible. Feel free to swap the cherries for raspberry or other pie fillings. You can also change the crust to suit your preference, using more graham cracker crumbs or a flavored variety.
Thanks for sharing your time in reading through these steps. We hope you love this recipe and keep it in your collection. If you made this many times, you know it always satisfies.
Always remember: nutritional information shared here is only a guide. For exact details, we recommend running the ingredients through an online nutritional calculator. Enjoy every bite of this easy treat.
____________________________________
No Bake Cherry Cheesecake
Ingredients
- 16 oz cream cheese (softened, full-fat preferred)
- 8 oz Cool Whip (or whipped topping)
- 14 oz sweetened condensed milk
- 2 tbsp lemon juice
- 21 oz cherry pie filling (or homemade cherry topping)
- 1½ cups graham cracker crumbs
- 5 tbsp melted butter
- ¼ cup sugar (optional, for a sweeter crust)
Instructions
1. Make the Crust
- In a mixing bowl, combine graham cracker crumbs, melted butter, and sugar (if using).
- Press the mixture firmly into the bottom of a 9-inch springform pan or baking dish.
- Refrigerate while preparing the filling.
2. Prepare the Cheesecake Filling
- In a large bowl, beat cream cheese, condensed milk, and lemon juice until smooth.
- Gently fold in Cool Whip until well combined.
3. Assemble the Cheesecake
- Spread the cheesecake filling evenly over the chilled crust.
- Cover with plastic wrap and refrigerate for at least 4 hours (overnight for best results).
- Once set, top with cherry pie filling before serving.
4. Optional Variations
- Swap cherry topping with raspberry, strawberry, or blueberry pie filling.
- Garnish with whipped cream or chocolate chips for extra flavor.
Video
Notes
- Calories: 380 kcal
- Total Fat: 22g
- Saturated Fat: 13g
- Cholesterol: 50mg
- Sodium: 260mg
- Carbohydrates: 42g
- Fiber: 1g
- Sugars: 30g
- Protein: 5g
Explore More Delicious Recipes
If you enjoyed diving into the No Bake Cherry Cheesecake recipe, why not explore more delightful dishes from our collection? Here are some must-try recipes to elevate your cooking adventures:
- Easy Woolworth Cheesecake Recipe To Impress Guests
- Brookie Recipe: Irresistibly Perfect Treat You’ll Crave
- Delicious Cherry Chip Cake Recipe You Must Try
- Mounds Cake Recipe So Good It Feels Like Magic
- Cake Mix And Cool Whip Cookies In 20 Minutes
Explore these recipes today to bring more exciting flavors to your table and make every meal memorable!
FAQs
1. What is the key to getting a firm no bake cherry cheesecake filling?
The main secret to a firm no bake cherry cheesecake lies in using softened cream cheese, adding a touch of lemon juice, and thoroughly chilling the dessert. The lemon juice helps the filling set, and proper chilling (at least four hours or overnight) ensures the cheesecake maintains its structure when sliced.
2. Can I use a store-bought crust for this no bake cherry cheesecake recipe?
Yes, a store-bought graham cracker crust works well if you’re short on time. However, many people prefer a homemade crust. You can make it by combining graham cracker crumbs with melted butter (and optional sugar). Press the crumb mixture into the bottom of a 9-inch springform pan or square baking dish for best results.
3. How do I keep my no-bake cheesecake from tasting too sweet?
If you find the flavor too sweet, reduce or omit any extra sugar in the crust and choose a cherry pie filling labeled “low sugar” or “unsweetened.” You can also swap Cool Whip for a lightly sweetened whipped topping. This helps balance sweetness without compromising the creamy texture of your no bake cherry cheesecake.
4. Can I use homemade cherry pie filling instead of a canned version?
Absolutely! Homemade cherry pie filling adds a fresh, tart twist. To make it, simmer fresh cherries with sugar, cornstarch, and a splash of lemon juice until thickened. Ensure it’s fully cooled before spreading it over the no-bake cheesecake filling to keep the layers distinct and the overall dessert from becoming runny.
5. What’s the best way to store and serve my no bake cherry cheesecake?
After assembling, cover the cheesecake with plastic wrap and chill it. Refrigerate leftovers for up to four days to maintain flavor and texture. For a longer shelf life, freeze individual slices in a sealed container for up to two weeks. Thaw frozen slices in the fridge before serving. Use a clean, sharp knife and wipe it between cuts to achieve neat slices every time.