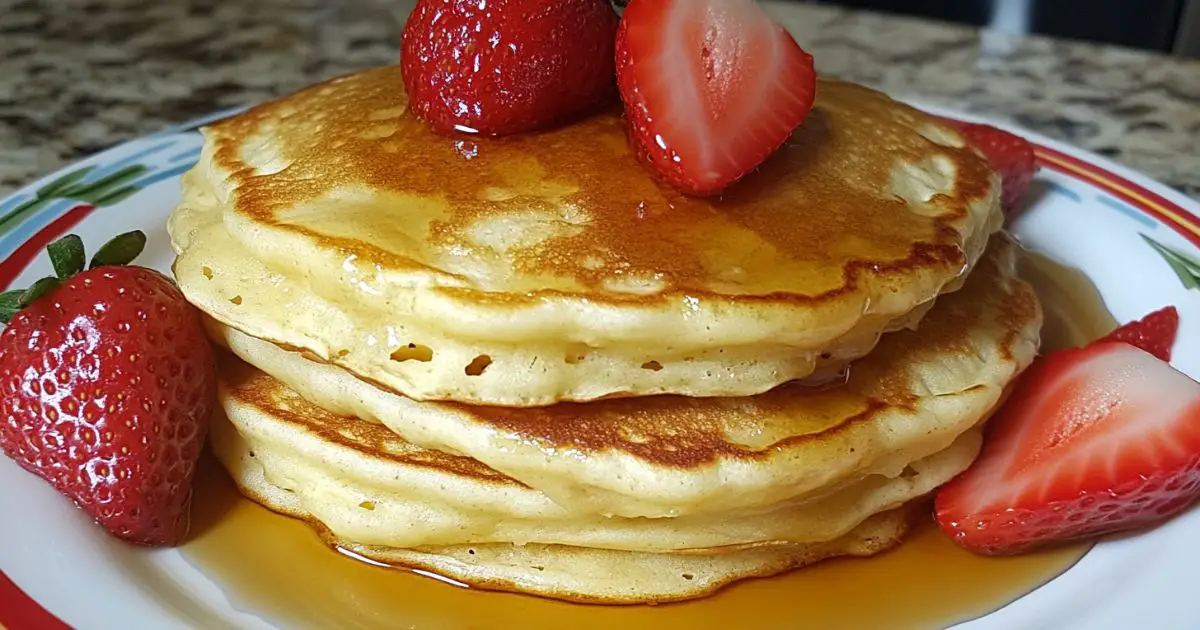
A warm welcome to all pancake lovers. Sourdough discard pancakes recipe bring a simple way to use leftover sourdough starter in a creative and tasty manner. If you enjoy a morning treat that smells heavenly and has a gentle tang, this recipe may soon become your favorite. These pancakes are light, airy, and slightly chewy at the edges. They pair well with toppings like fresh berries, sliced bananas, honey, maple syrup, or a simple knob of butter that melts on contact.
If you already maintain a sourdough starter, you might face the question of what to do with the portion you remove during feedings. That removed portion is called “sourdough discard.” Instead of throwing it away, you can use it in baked goods such as breads, muffins, or even pizza dough. But pancakes are often the easiest route. They cook quickly, and their flavor pairs well with sourdough’s tang.
This article will provide a thorough guide on how to transform your sourdough discard into a mouthwatering stack of pancakes. We’ll talk about ingredients, step-by-step instructions, and ways to store and serve them. We’ll also cover tips and possible variations to accommodate different tastes and skill levels. Feel free to follow along as if we’re chatting in your kitchen. Let’s begin.
Why You’ll Love This Recipe
1. Great Way to Use Leftover Starter
Maintaining a sourdough starter can be a source of pride, but it does require regular feedings. Each feeding often results in a small container of discarded starter, which can accumulate. Rather than tossing it, you can put it to good use. These pancakes turn a humble leftover into a morning treat.
2. Fluffy and Light Texture
Sourdough discard pancakes gain a unique lift from the natural yeast in the starter. The result is a tender pancake with a springy texture. When paired with a leavening agent like baking powder or baking soda, these pancakes rise nicely.
3. Subtle Tang
Many pancake recipes taste good but lack depth. This sourdough version has a gentle tang that sets it apart. You still get a sweet, buttery pancake, but there’s an extra dimension of flavor that keeps every bite interesting.
4. Simple Ingredients
You don’t need fancy items for this recipe. Basic pantry staples such as flour, sugar, salt, baking powder, milk, and eggs are enough. The sourdough discard is the star ingredient, adding personality to an otherwise standard pancake batter.
5. Perfect for All Skill Levels
A sourdough discard pancake recipe might sound challenging, but it’s actually quite easy. If you’re new to cooking, you can follow the steps one by one. If you’re more experienced, feel free to experiment with add-ins or alternative flours.
6. Ideal for Breakfast or Brunch
These pancakes suit different occasions. Cook up a batch for a quick weekday breakfast, or plan a bigger spread on weekends. Either way, sourdough discard pancakes elevate a normal morning routine into a relaxing treat.
Ingredients

Below is a clear list of ingredients you’ll need for a batch of sourdough discard pancakes. Feel free to scale the quantity up or down based on the number of servings you need. Each ingredient plays an important role in the final flavor and texture.
- Sourdough Discard (1 cup / ~240g)
- This is the leftover starter from regular feedings. Make sure it’s not spoiled or past its safe window. If it has a foul smell, discard it.
- The best discard to use is from a mature starter that’s at least a couple of weeks old. This ensures a deeper flavor.
- All-Purpose Flour (1 cup / ~120g)
- A standard flour that provides structure to your pancakes.
- If you prefer a wheat flour or a blend of whole wheat and all-purpose, you can try a 50-50 ratio for extra fiber.
- Milk (1 cup / ~240ml)
- Helps form a smooth batter. You can use dairy milk or a dairy-free option like almond milk or soy milk if you prefer.
- Egg (1 large)
- Binds the ingredients, adding richness and structure. It also contributes to a golden color.
- Baking Powder (2 teaspoons)
- Works alongside the sourdough discard to make the pancakes light. Look for a fresh, active baking powder to ensure a good rise.
- Baking Soda (¼ teaspoon)
- Teams up with the acid in the sourdough discard to provide extra lift.
- Sugar (1–2 tablespoons)
- Adds mild sweetness. You can adjust the amount based on how sweet you like your pancakes. Brown sugar can offer a hint of molasses flavor if you want something richer.
- Salt (½ teaspoon)
- Balances the sweetness and enhances flavor.
- Butter or Neutral Oil (for greasing the pan)
- Necessary for cooking the pancakes. Butter gives a classic taste, while oil may be preferable if you want a less buttery flavor.
Ingredient Tips:
- Sourdough Discard Freshness: Try to use sourdough discard that’s been in the fridge for no more than a week. This helps ensure a pleasant tang without excessive sourness.
- Consistency Adjustments: If your batter feels too thick, add a splash of milk. If it’s too thin, sprinkle in a bit more flour.
- Possible Flavor Boosters: A dash of vanilla extract can add a sweet aroma. A sprinkle of cinnamon also pairs nicely.
How to Make Sourdough Discard Pancakes Recipe
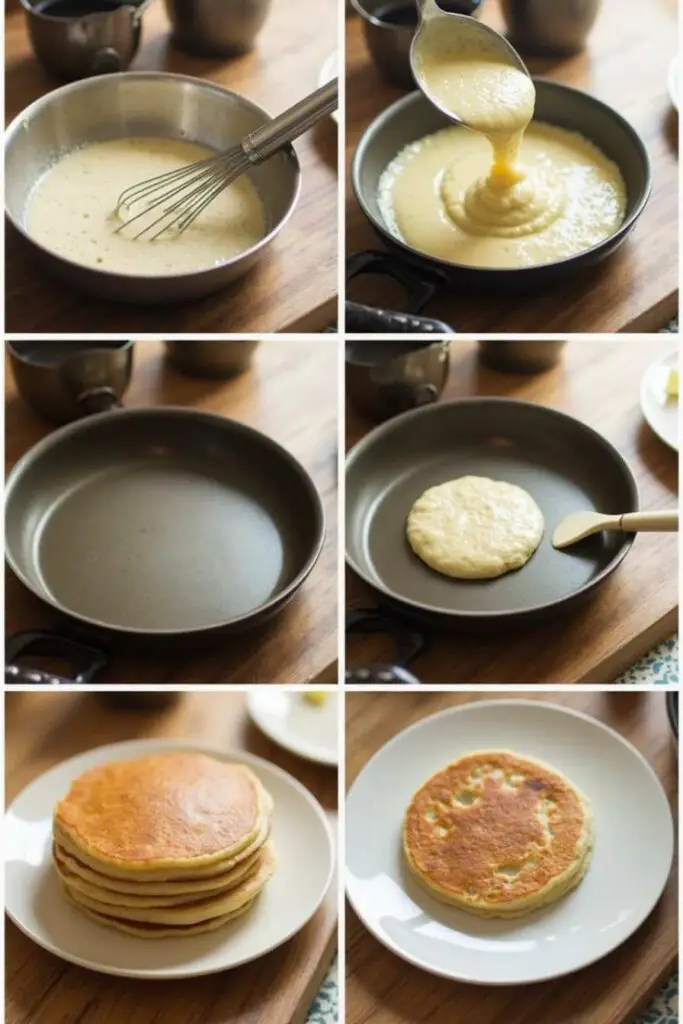
In this section, we’ll share a detailed method for cooking your pancakes. Each step includes tips so you can avoid common errors. By following the instructions with care, you’ll get fluffy and inviting pancakes every time.
Step 1: Gather Your Tools
- Mixing Bowls: You’ll need two bowls—one for dry ingredients and one for wet ingredients.
- Whisk or Fork: A whisk helps create a smooth batter.
- Measuring Cups and Spoons: Precision ensures consistent results.
- Stove or Griddle: A non-stick pan or cast-iron skillet also works well.
- Spatula: For flipping pancakes without breaking them.
Step 2: Prepare the Dry Ingredients
- In a medium bowl, combine flour, baking powder, baking soda, sugar, and salt.
- Stir gently with a whisk to ensure even distribution of all dry components.
- Make a small well in the center of this dry mixture. This step helps with combining wet and dry ingredients later.
Step 3: Mix the Wet Ingredients
- In a separate bowl, whisk together the sourdough discard, milk, and egg.
- Whisk until the mixture becomes frothy and the sourdough discard is well-integrated.
- This step is crucial for breaking up any lumps of discard and achieving a uniform texture.
Step 4: Combine Dry and Wet Mixtures
- Pour the wet mixture into the well you made in the dry ingredient bowl.
- Stir gently with a whisk or a spatula. Aim for a batter that’s combined but not overly stirred. Overmixing can lead to tough pancakes.
- Scrape down the sides of the bowl to include any dry flour that might be stuck. If the batter seems lumpy, that’s okay. A few lumps are normal and can lead to a lighter texture.
Step 5: Let the Batter Rest (Optional but Recommended)
- Set the batter aside for about five minutes. This resting period allows the gluten to relax, which can help the pancakes stay tender.
- Also, the baking powder and baking soda can start reacting with the sourdough discard, helping the batter fluff up.
Step 6: Heat Your Pan or Griddle
- Place a non-stick pan or griddle over medium heat.
- Lightly grease the cooking surface with butter or oil. Use a small piece of butter or a quick drizzle of oil, spreading it around with a paper towel to keep it even.
- Check the heat by sprinkling a few drops of water on the pan. If they sizzle and evaporate quickly, the pan is hot enough.
Step 7: Start Cooking
- Use a ¼ cup scoop to pour the batter onto the pan. The ¼ cup measurement ensures you get pancakes that cook consistently in size.
- Wait until small bubbles start to form on the surface, and the edges appear slightly set. This usually takes about 2–3 minutes, but times can vary based on your stove.
- Once you see the bubbles and the edges firm up, slide a spatula under the pancake and flip it in one quick motion. Cook the other side for another 1–2 minutes, or until golden brown.
- Transfer the cooked pancake to a plate, and repeat with the rest of the batter.
Step 8: Continue Until All Batter Is Used
- Keep an eye on the pan’s heat. If the pancakes are browning too fast, adjust the heat down. If they’re cooking too slowly, turn it up slightly.
- If your pan or griddle starts to look dry, add a small dab of butter or a quick drizzle of oil before pouring more batter.
Step 9: Finishing Touches
- Stack pancakes on a serving plate. You may place a small pat of butter between each pancake if you want a richer stack.
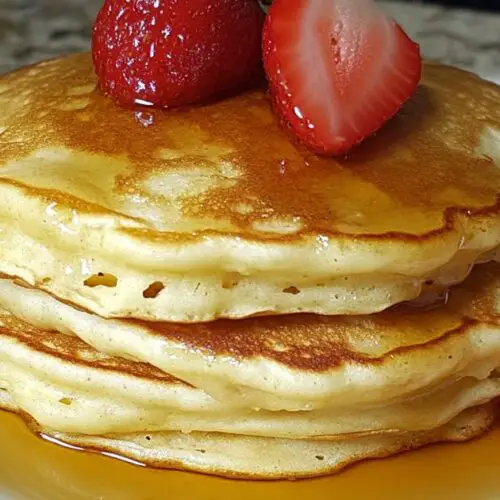
- Drizzle them with pure maple syrup, honey, or your preferred topping. Fruits like berries or banana slices go well with these flavors.
- If you plan to serve all pancakes at once, you can keep them warm in an oven set to a low temperature (around 200°F / 95°C) while cooking the rest.
Serving and Storage Tips
1. Serving Ideas
- Classic Stack: Top your pancakes with a pat of butter and drizzle with warm maple syrup for a classic approach.
- Fruity Twist: Add fresh berries, sliced bananas, or diced peaches. The fruit’s sweetness balances the slight tang of the sourdough.
- Whipped Cream and Berries: For a more indulgent take, add a dollop of whipped cream and some fresh strawberries.
- Nuts and Seeds: Crushed nuts or seeds add a bit of crunch and extra nutrients.
2. Storage
- Short-Term Storage: If you plan to eat them within a day or two, keep leftover pancakes in a sealed container in the fridge. Make sure they have cooled fully before storing.
- Long-Term Storage: You can freeze leftover pancakes. Line a baking sheet with parchment paper, lay the pancakes in a single layer, and place in the freezer until they’re firm. Then, move them into a freezer-safe bag or container. This method prevents them from sticking together.
3. Reheating
- Microwave Method: Place a pancake on a microwave-safe plate and heat for 20–30 seconds. This is quick and convenient.
- Oven Method: For a bigger batch, arrange pancakes on a baking sheet and warm in a 350°F (175°C) oven for about 5–10 minutes.
- Toaster Method: Pop a pancake in your toaster on a low setting if you want a slightly crisp exterior.
A detailed guide on freezing pancakes and reheating them for the best results.
Helpful Notes
Below are extra tips, techniques, and variations to ensure success, no matter your skill level or dietary preferences.
1. Batter Consistency
- If your batter is too runny, the pancakes may spread too much. A thicker batter often leads to fluffier pancakes. If you prefer a thinner pancake, add a small amount of milk to the batter.
2. Add-Ins and Variations
- Blueberries or Chocolate Chips: Fold a handful of fresh or frozen blueberries, or some chocolate chips, into the batter after mixing the dry and wet ingredients together.
- Whole Wheat Flour: Try using half whole wheat flour for a heartier texture. Increase the milk slightly if the batter becomes too thick.
- Dairy-Free: Swap out the milk for a plant-based alternative like almond milk, oat milk, or soy milk. Use oil instead of butter to coat the pan.
3. Getting Even Color
- Make sure the pan is evenly heated. Uneven heating can cause one side of the pancake to cook faster than the other side.
- If you notice the first pancake looks undercooked or too dark, adjust your heat accordingly. Pancakes can act as a good “test” to dial in the correct temperature.
4. Handling Leftover Sourdough Discard
- Timing: If you know you plan to make pancakes the next morning, you can collect discard in a container and keep it chilled. This ensures freshness and a comfortable tang.
- Multiple Batches: If you have extra sourdough discard, whip up more than one batch and freeze some pancakes for busy mornings.
5. Texture Tips
- Light Mixing: Over-stirring can lead to dense pancakes. A light hand keeps the gluten network from overdeveloping.
- Resting the Batter: Even a short rest can improve texture, giving the dry ingredients time to absorb the wet ones fully.
6. Skill Level Adaptations
- Beginner: Follow the recipe exactly, and pay close attention to the pan temperature. A simple digital thermometer that reads surface heat might help.
- Intermediate: Experiment with blending flours (e.g., a bit of rye flour or spelt). You can also top pancakes with creative sauces like warm fruit compote.
- Advanced: Play around with extra flavor elements, such as folding whipped egg whites into the batter or adding spices. Just be sure to avoid overcomplicating the process to maintain that classic pancake profile.
Conclusion
You’ve now reached the end of this comprehensive guide on sourdough discard pancakes. We covered everything from selecting fresh ingredients and mixing the batter to storing and reheating your leftovers. This pancake recipe is a handy solution to the common question of what to do with sourdough discard, turning it into a delicious and fluffy meal that suits any time of the day. The subtle tang of sourdough pairs well with the sweet and buttery nature of classic pancakes.
Feel free to use this recipe as a base and explore ways to make it your own. Whether you serve it with simple maple syrup or add fruit toppings, these pancakes are sure to be a hit. We hope you give them a try, then share your experiences. Cooking should be enjoyable, so don’t stress the small details. Once you’ve tried making these once or twice, you’ll find that the process becomes second nature.
Thank you for joining this friendly chat about sourdough discard pancakes. We trust that you’re now equipped with the know-how you need to whip up a satisfying breakfast or brunch. Enjoy your stack of fluffy pancakes, and remember to keep saving that leftover sourdough starter for future batches.
______________________________
Sourdough Discard Pancakes Recipe
Ingredients
Dry Ingredients
- 1 cup 120g all-purpose flour
- 2 teaspoons baking powder
- ¼ teaspoon baking soda
- 1 –2 tablespoons sugar adjust to taste
- ½ teaspoon salt
Wet Ingredients
- 1 cup 240g sourdough discard (room temperature)
- 1 cup 240ml milk (dairy or non-dairy)
- 1 large egg
- 1 teaspoon vanilla extract optional
For Cooking
- Butter or neutral oil for greasing the pan
Instructions
Step 1: Gather Your Tools
- Mixing Bowls: You’ll need two bowls—one for dry ingredients and one for wet ingredients.
- Whisk or Fork: A whisk helps create a smooth batter.
- Measuring Cups and Spoons: Precision ensures consistent results.
- Stove or Griddle: A non-stick pan or cast-iron skillet also works well.
- Spatula: For flipping pancakes without breaking them.
Step 2: Prepare the Dry Ingredients
- In a medium bowl, combine flour, baking powder, baking soda, sugar, and salt.
- Stir gently with a whisk to ensure even distribution of all dry components.
- Make a small well in the center of this dry mixture. This step helps with combining wet and dry ingredients later.
Step 3: Mix the Wet Ingredients
- In a separate bowl, whisk together the sourdough discard, milk, and egg.
- Whisk until the mixture becomes frothy and the sourdough discard is well-integrated.
- This step is crucial for breaking up any lumps of discard and achieving a uniform texture.
Step 4: Combine Dry and Wet Mixtures
- Pour the wet mixture into the well you made in the dry ingredient bowl.
- Stir gently with a whisk or a spatula. Aim for a batter that’s combined but not overly stirred. Overmixing can lead to tough pancakes.
- Scrape down the sides of the bowl to include any dry flour that might be stuck. If the batter seems lumpy, that’s okay. A few lumps are normal and can lead to a lighter texture.
Step 5: Let the Batter Rest (Optional but Recommended)
- Set the batter aside for about five minutes. This resting period allows the gluten to relax, which can help the pancakes stay tender.
- Also, the baking powder and baking soda can start reacting with the sourdough discard, helping the batter fluff up.
Step 6: Heat Your Pan or Griddle
- Place a non-stick pan or griddle over medium heat.
- Lightly grease the cooking surface with butter or oil. Use a small piece of butter or a quick drizzle of oil, spreading it around with a paper towel to keep it even.
- Check the heat by sprinkling a few drops of water on the pan. If they sizzle and evaporate quickly, the pan is hot enough.
Step 7: Start Cooking
- Use a ¼ cup scoop to pour the batter onto the pan. The ¼ cup measurement ensures you get pancakes that cook consistently in size.
- Wait until small bubbles start to form on the surface, and the edges appear slightly set. This usually takes about 2–3 minutes, but times can vary based on your stove.
- Once you see the bubbles and the edges firm up, slide a spatula under the pancake and flip it in one quick motion. Cook the other side for another 1–2 minutes, or until golden brown.
- Transfer the cooked pancake to a plate, and repeat with the rest of the batter.
Step 8: Continue Until All Batter Is Used
- Keep an eye on the pan’s heat. If the pancakes are browning too fast, adjust the heat down. If they’re cooking too slowly, turn it up slightly.
- If your pan or griddle starts to look dry, add a small dab of butter or a quick drizzle of oil before pouring more batter.
Step 9: Finishing Touches
- Stack pancakes on a serving plate. You may place a small pat of butter between each pancake if you want a richer stack.
- Drizzle them with pure maple syrup, honey, or your preferred topping. Fruits like berries or banana slices go well with these flavors.
- If you plan to serve all pancakes at once, you can keep them warm in an oven set to a low temperature (around 200°F / 95°C) while cooking the rest.
Notes
- Calories: 210 kcal
- Fat: 6g
- Saturated Fat: 2g
- Cholesterol: 55mg
- Sodium: 300mg
- Carbohydrates: 31g
- Fiber: 1g
- Sugars: 5g
- Protein: 6g
Explore More Delicious Recipes
If you enjoyed diving into the Sourdough Discard Pancakes Recipe, why not explore more delightful dishes from our collection? Here are some must-try recipes to elevate your cooking adventures:
- Ritz Cracker Chicken Casserole: A comforting and creamy casserole perfect for family dinners.
- Creamy Garlic Parmesan Chicken Recipe: A rich and flavorful chicken dish infused with garlic and Parmesan.
- Philly Cheesesteak Pasta Recipe: A cheesy, meaty pasta dish inspired by the iconic Philly cheesesteak.
- Cherry Scones Recipe: Sweet and flaky scones bursting with cherry flavor.
- Chicken Ricotta Meatballs with Spinach Alfredo Sauce: Tender ricotta meatballs in a creamy spinach Alfredo sauce.
- Smoked Chicken Thighs Recipe: Juicy and smoky chicken thighs perfect for BBQ enthusiasts.
- Forgotten Chicken Recipe: A simple yet flavorful chicken recipe that’s hard to forget.
- Beef and Broccoli Recipe: A classic take on this popular Chinese-inspired dish.
- Mounds Cake Recipe: A decadent chocolate cake inspired by the classic Mounds candy bar.
Explore these recipes today to bring more exciting flavors to your table and make every meal memorable!
FAQs
Below are common questions that may come up as you prepare sourdough discard pancakes. If you still have doubts, you can experiment in your kitchen while keeping these pointers in mind.
1. Can I Use Sourdough Discard That’s Over a Week Old?
It’s best to stick with fresh sourdough discard to ensure a pleasant flavor. If your discard has been sitting in the fridge for more than a week, it could develop a very strong or off smell. Always check if the discard looks or smells suspicious. When in doubt, it’s safer to feed your starter and collect a fresher batch of discard.
2. Do I Have to Use Both Baking Powder and Baking Soda?
Yes, using both helps achieve the best rise. The baking soda reacts with the acids in the sourdough discard, while the baking powder provides additional lift. You can omit one if you’re in a pinch, but the results might not be as fluffy.
3. What Type of Pan Is Best for Cooking Pancakes?
A non-stick skillet or well-seasoned cast-iron pan is ideal. These surfaces release pancakes easily without tearing. A griddle works as well, especially if you want to cook several pancakes at once.
4. Can I Prepare the Batter the Night Before?
You can, but the pancakes might develop a stronger tang due to fermentation. If you prefer a mild tang, it’s best to prepare the batter and cook right away. If you’re short on time in the morning, you can measure and combine the dry ingredients in one container and the wet ingredients in another. Then, just mix them together when you’re ready to cook.
5. How Can I Make My Pancakes More Filling?
If you want a more filling pancake, you can fold in a handful of rolled oats, chopped nuts, or seeds. A tablespoon of chia seeds or ground flaxseeds can also offer extra nutrition. Keep an eye on the batter’s thickness and add more milk if needed.
6. Can I Use This Recipe Without Sourdough Discard?
While the focus is on sourdough discard, you can try substituting extra flour plus a bit of water for the discard in a pinch, along with a teaspoon or two of vinegar to mimic tang. However, that might reduce the unique flavor and texture that sourdough discard provides.
7. Is This Recipe Kid-Friendly?
Yes, kids often love pancakes. The tang from the sourdough discard is mild enough that most children won’t find it off-putting. Feel free to sweeten the batter a bit more if that helps. Adding chocolate chips or fruit can also make the pancakes more appealing to younger eaters.
8. Can I Make a Gluten-Free Version?
You can try using a gluten-free flour blend and a gluten-free sourdough starter. Results may vary based on the blend you use, so experiment to find the best combination. Keep a little more liquid on hand, as some gluten-free flours absorb moisture faster.
9. Why Are My Pancakes Gummy in the Middle?
Undercooking can leave pancakes gummy. Cook each side until bubbles form and the edges look set. You can also lower the heat and cook them more slowly if they are browning too fast on the outside. Another tip is to check your baking powder’s freshness, as expired leavening agents can affect texture.
10. What Other Recipes Can I Try with Sourdough Discard?
Aside from pancakes, you can bake waffles, muffins, or quick breads using sourdough discard. It adds depth to almost any recipe that uses flour and some form of leavening. Feel free to get creative in the kitchen.
Enjoy your homemade sourdough discard pancakes! Feel free to come back to this guide anytime you have questions or want to experiment with new flavors. The gentle tang, fluffy texture, and satisfying aroma make these pancakes a treasured breakfast item for many sourdough enthusiasts. We hope you find them as delightful as we do.